This article is about Box Shuttle in the Admin Console. If you’re using legacy Box Shuttle, a standalone tool, see legacy migration guides.
Overview
Box Shuttle acts as an intermediary between various content management systems, enabling you to transfer folders, files, permissions, and metadata from these platforms to Box. You have two options to migrate your data:- Migrate data only: migrates files and folders from a selected source path of an account or folder to the selected target location without applying permissions.
- Migrate data with permissions: transfers not only files and folders, but also permissions from one location to another. This type of migration job is suitable for comprehensive management of files, accounts, and privileges throughout the entire data migration process.
Box Shuttle does not migrate permissions or collaboration data for external users.
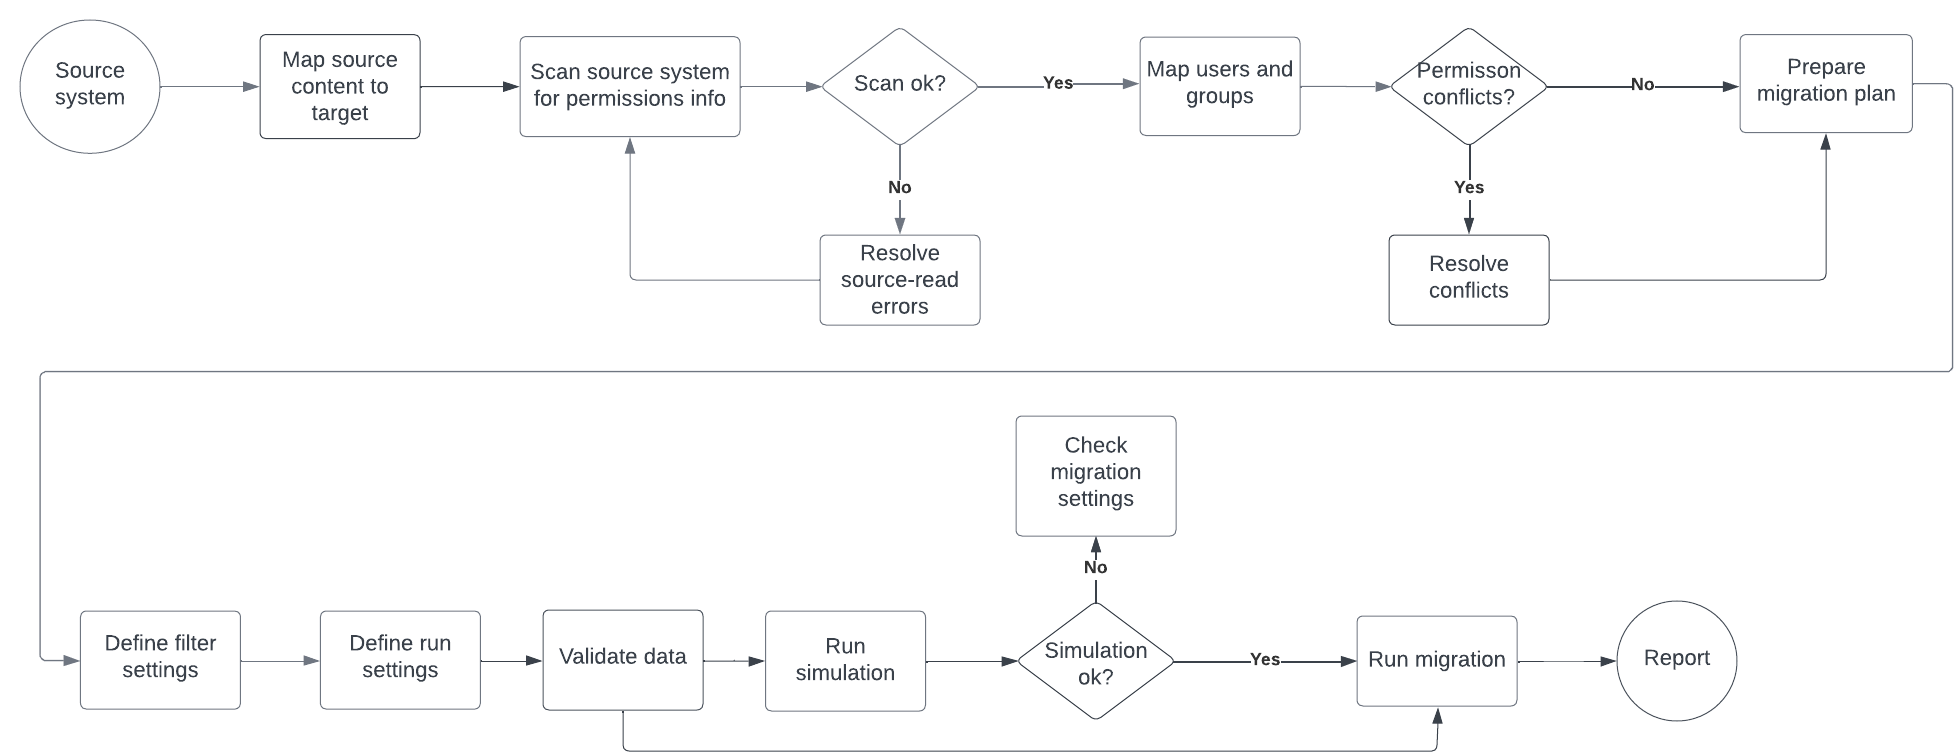
| Step | Description |
|---|---|
| 1 | Select the source system. |
| 2 | Map the source content to the target location, by hand or in a spreadsheet. |
| 3 | Scan the source system for any information related to permissions set on files and folders. |
| 4 | If the scan returns a list of errors, resolve them in the source system, and re-scan the source system. |
| 5 | Map source users and groups to their Box counterparts. If the scan detects any permission conflicts, decide how to resolve them. |
| 6 | Specify additional content filters and other settings for the migration job. Available settings can differ depending on the source system. |
| 7 | Define run settings to set up upload bandwidth value (for Windows sources only) and mirror deletions. |
| 8 | Check the content and settings to make sure everything is correct. |
| 9 | Run a simulation of the migration. This step is optional and you can proceed directly to migration, but Box recommends it, especially if you are running a migration for the first time. A simulation confirms that all the necessary information is in place and ready for migration. |
| 10 | Once you have examined the simulation report, run the migration. When the migration is done, you can examine the resulting report. |
Create a new job
To create a new job, select Migrate Data from the New Job drop-down menu.Select source system
Select the source system that holds the data you want to migrate. If you don’t have an existing source system available, set it up using Source system configuration instructions.Box Shuttle cannot alter or modify your source data.
Map files and folders
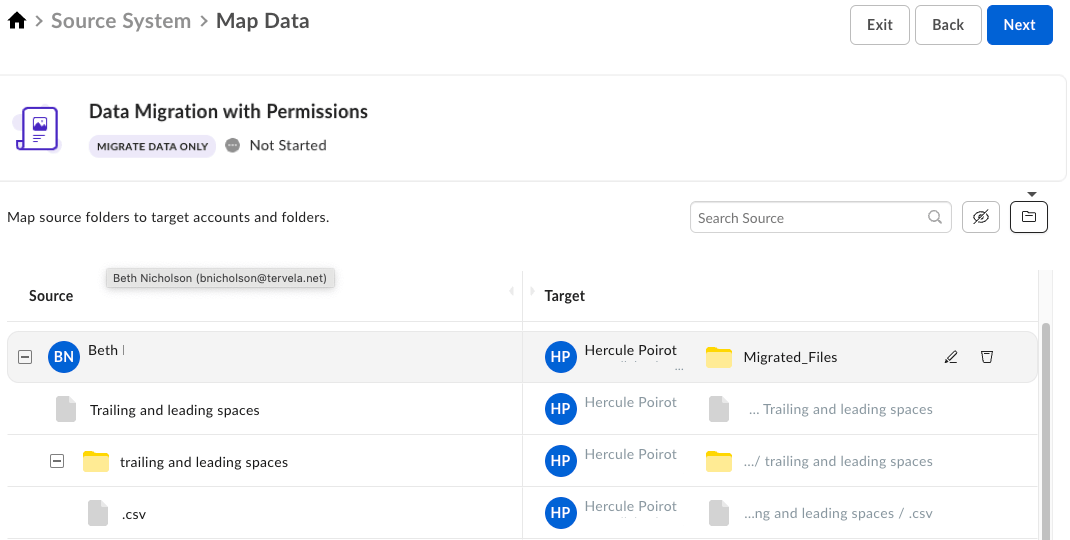
Map the source system data to the Box file and folder structure. A settings page precedes this step and asks how you want to map. Select Map Data manually to map each item in Box Shuttle, as described below, or map a large number of directories at once with bulk mapping with a spreadsheet. For each source account or folder you want to migrate, select the target account and folder that receives the data. When you select a folder, Box Shuttle migrates that folder or account along with every file and folder inside it. You can, however, deselect specific subfolders or files you don’t want migrated.Make sure that all Box users have confirmed their invitations. You cannot transfer data to a Box account of a user who did not accept the invitation.
Set parent directory
You can set a parent directory that Box Shuttle creates in each target location for the migrated content. To do so:- Select the folder icon next to the search bar.
- Enter the name for the parent directory and confirm.
- A source folder is explicitly mapped to a folder in a target account. One of the child folders or files is also redirected to a target folder in a different account, so a redirect icon displays at the parent folder level.
- This source folder was redirected to a different target account, and a child folder or file was skipped.
- This folder was skipped and is not migrated.
| Item | Level of display | Description |
|---|---|---|
| Folder | An item in a specific folder is explicitly included in the migration. This file is migrated, even though the folder is not. | |
| Folder | Files in the folder were skipped. These files are not migrated. | |
| Folder, Account | An item in the folder was redirected to a different folder or account. | |
| Folder, Account | A file or files in one of the child folders are explicitly included in the migration. Icon displayed when you select files in several folders. | |
| File, Folder, Account | Clears the mapping. | |
| File, Folder, Account | Opens the list with target account folders. Use it to:
| |
| File, Folder, Account | Skips the file in the folder. This file is not migrated. | |
| File, Folder, Account | Includes the skipped file in the migration. |
Choose migration type
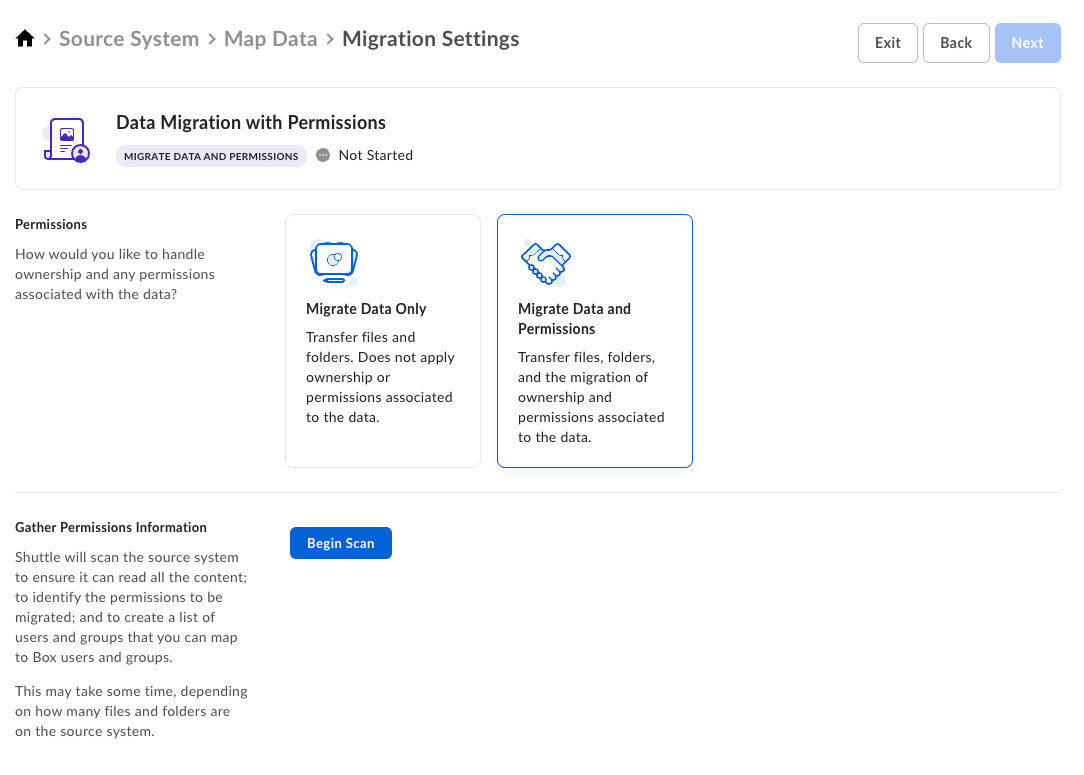
Migrating data with permissions means transferring not only files and folders, but also ownership rights and permissions from one location to another. This type of migration job is suitable for comprehensive management of files, accounts, and privileges throughout the entire data migration process.- After you are done with the mapping, select Migrate Data with Permissions from the available options.
- A new section displays, enabling you to collect information about permissions applied to source files and folders. Select Begin Scan to scan the source items.
Run permissions scan
During the permissions scan, Shuttle scans the source files and folders to identify permissions applied to folders and files.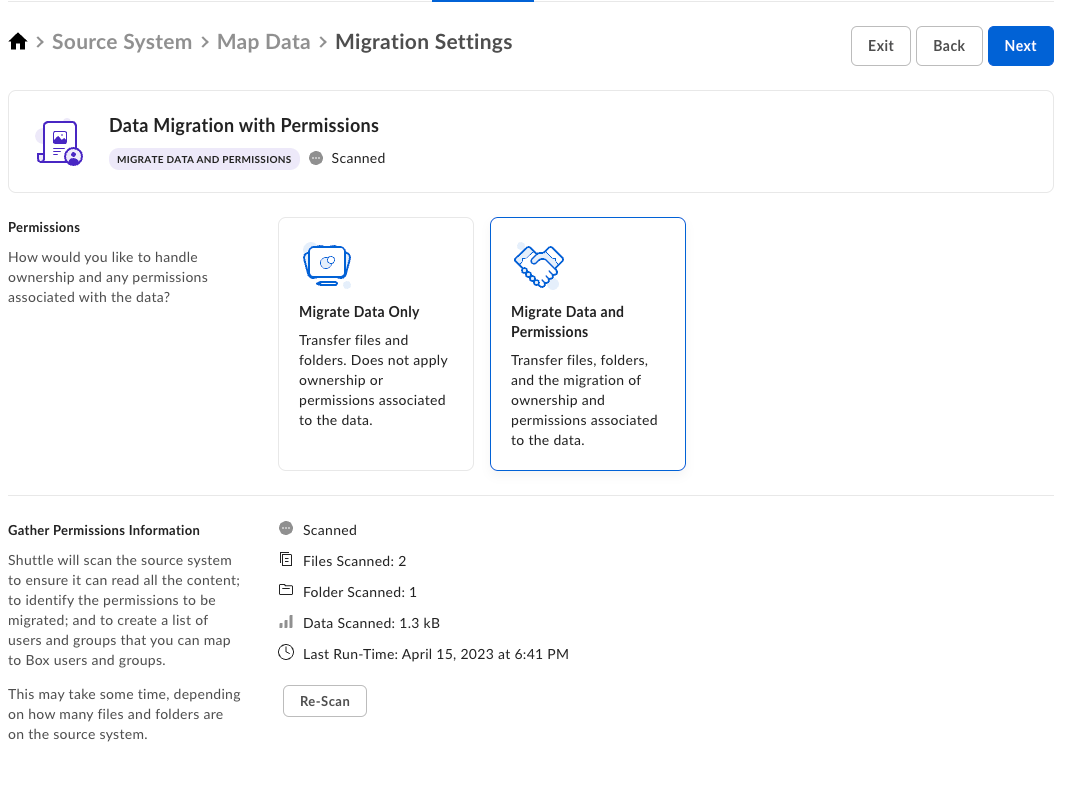
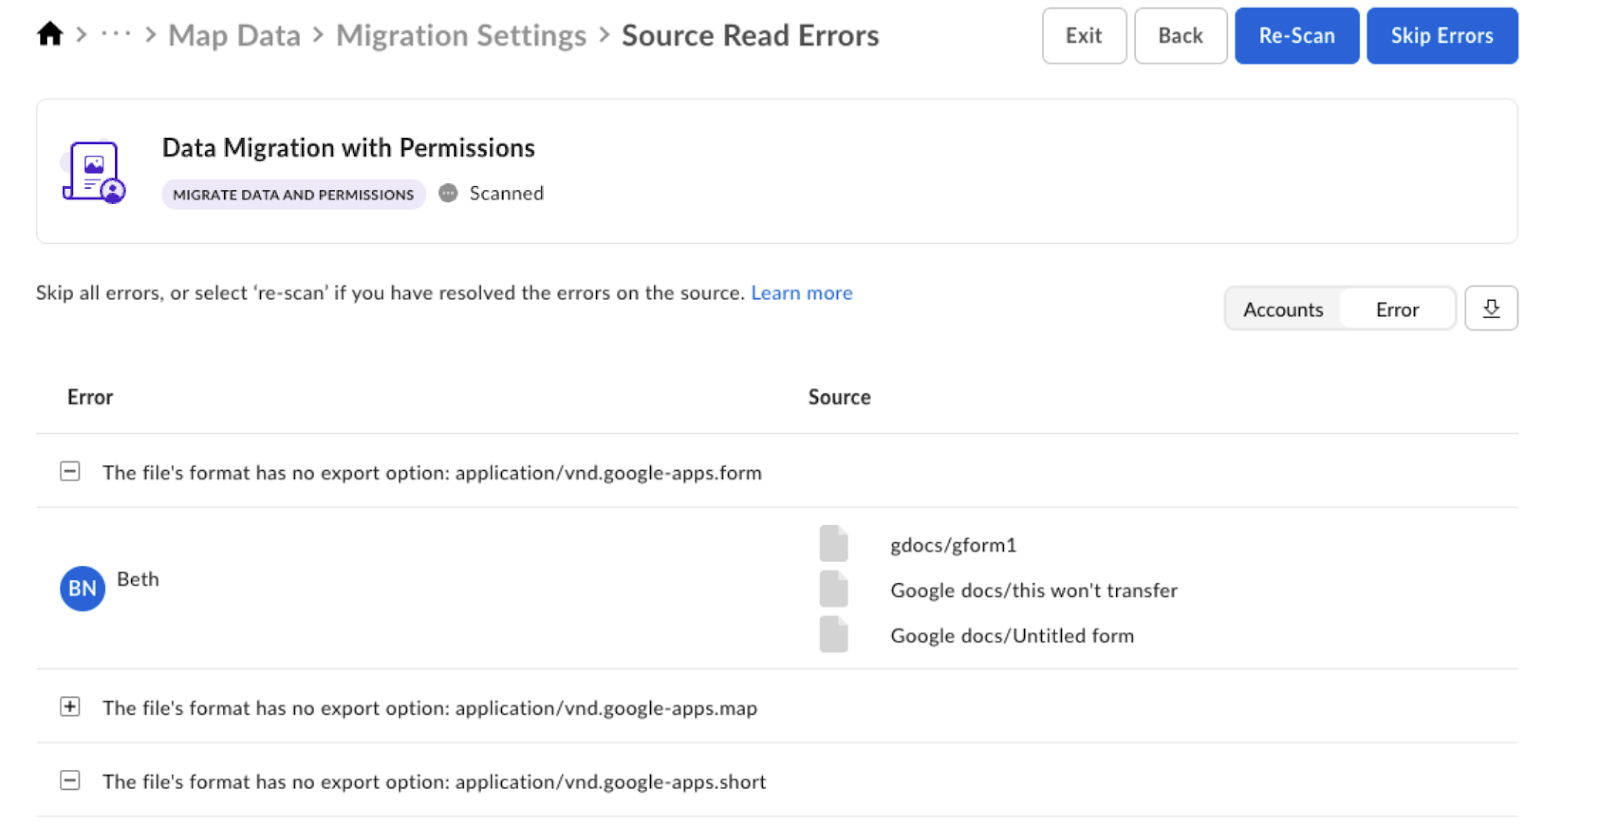
Source errors
The scan might result in errors. For example, a particular file format might have no export options. If any errors occur, you have two options:- Resolve these errors in the source system and re-scan the directories.
- Skip content that has errors and proceed with migration.
Map users and groups
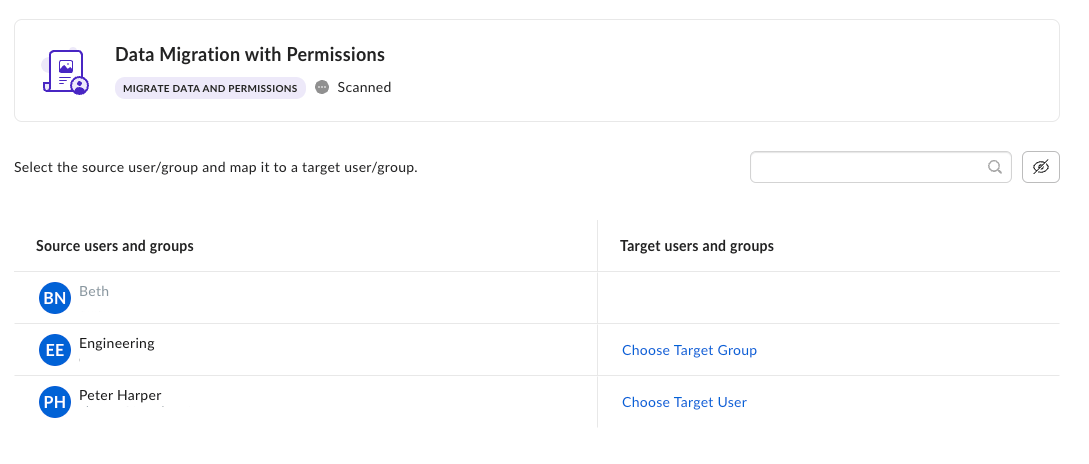
A settings page precedes this step and asks how you want to map. Select Map users and groups manually to map each user and group in Box Shuttle, as described below, or map them in a spreadsheet with bulk mapping with a spreadsheet. Select each source user or group and map it to a specific target account or group. You can also skip specific users and user groups.You must assign each user or group to a target counterpart, apart from the ones that you skip. Make sure that all mapped Box accounts have confirmed their invitations.
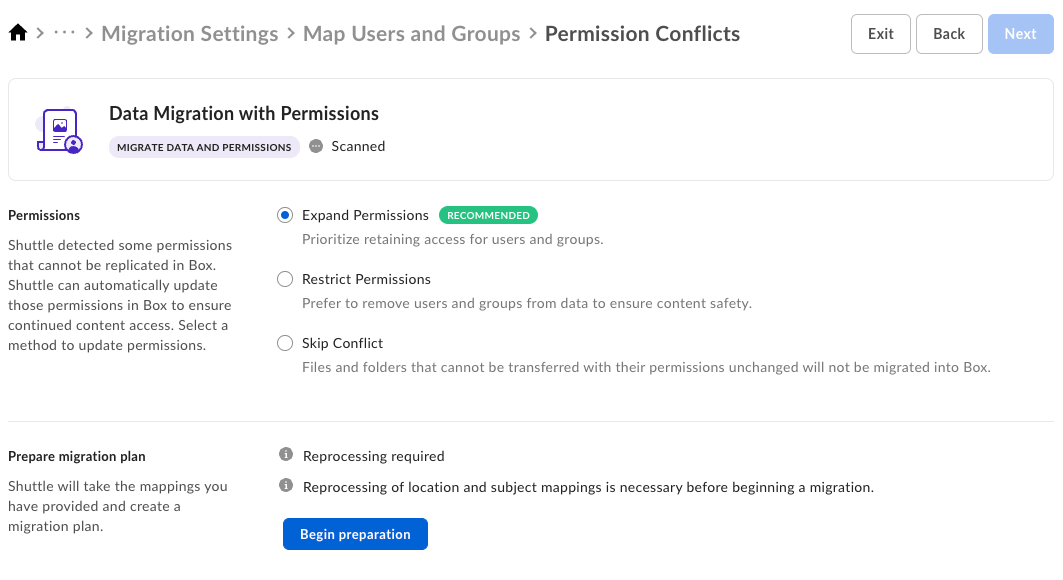
Resolve permission conflicts
At this point, you can choose how to resolve permission conflicts during the data migration.- Expand permissions is recommended for most migrations, because it preserves the access on Box that users had on the source.
- Restrict permissions and Skip conflict are useful for migrations where it is essential to preserve the limited access and data confidentiality present on the source.
- Skip conflict means that content is not migrated to Box. Make sure you have a plan to migrate that content as part of your overall migration.
| Action | Description | Diagram |
|---|---|---|
| Expand permissions | Adds permissions to child folders or files if they have fewer permissions than a parent. | 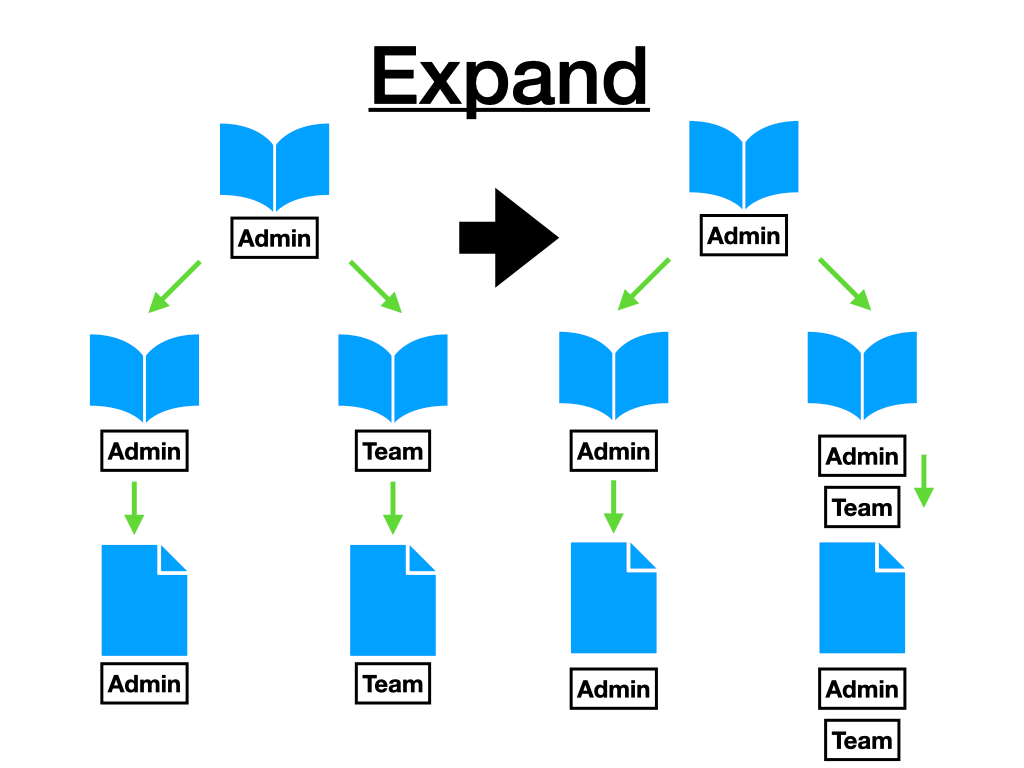 |
| Restrict permissions | Removes permissions from the parent folder if a child has fewer permissions than the parent. | 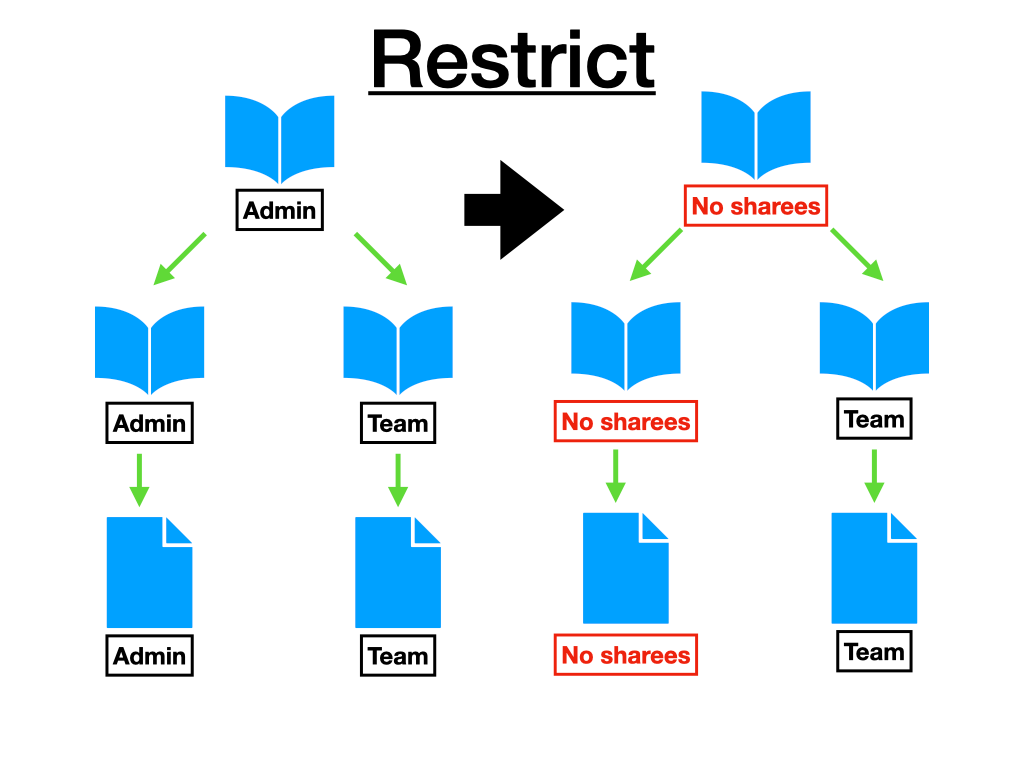 |
| Skip conflict | These folders or files are not transferred in the data migration because they have reduced permissions relative to a parent. They display as filtered in results. | 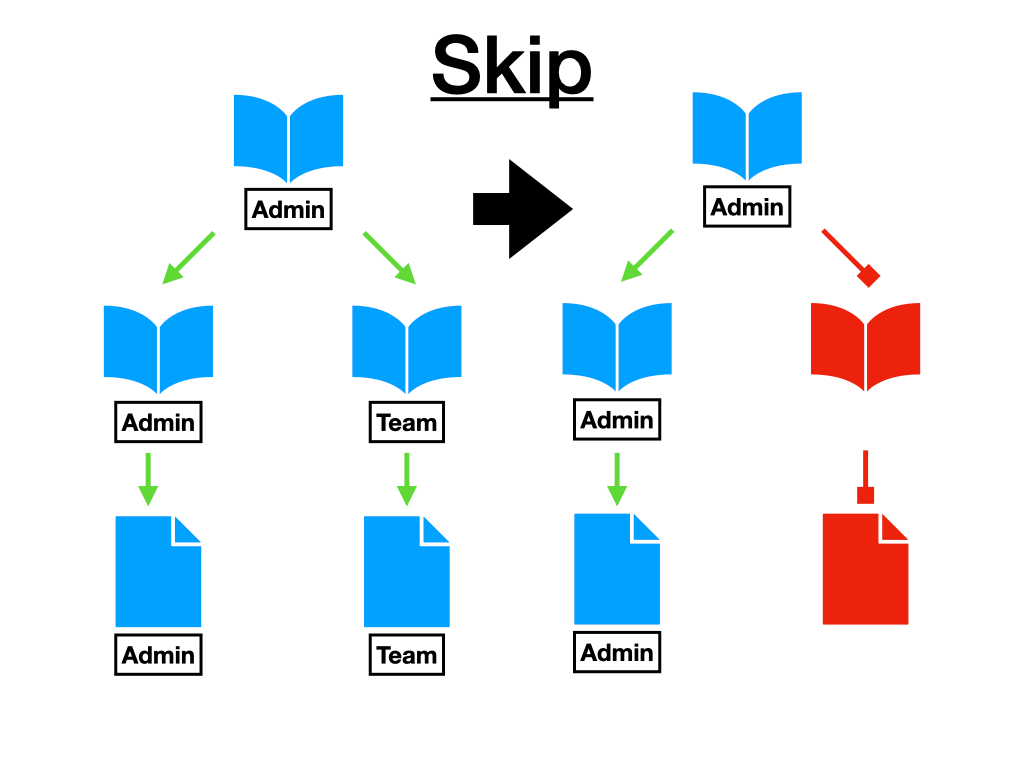 |
Define filters and additional settings
-
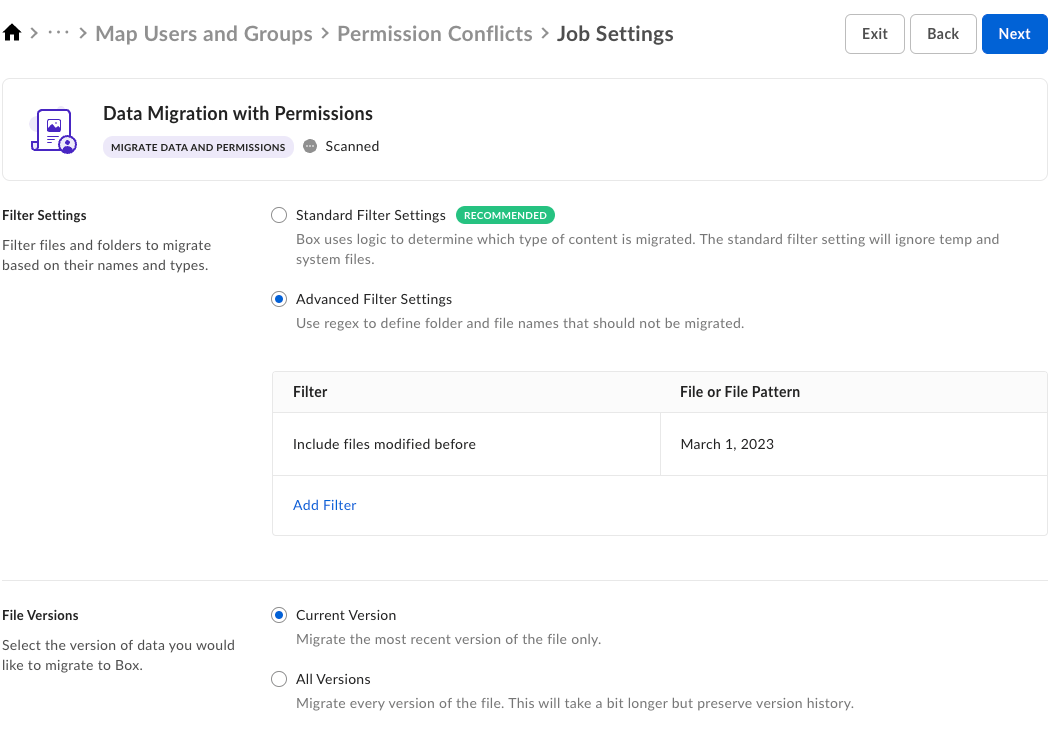
Filter settings enable you to further specify which folders and files to include in the migration or exclude from the process.
- Standard Filter settings ignore temp and system files, and migrate everything else. This is the recommended setting.
- Advanced Filter settings filter the content on the basis of a regular expression, date, or size.
- File versions settings enable you to choose whether to migrate the most recent version only, or all versions of the file.
The presence of file version settings depends on the source system chosen. For example, migration from Windows files has only filter settings available for you to use.
Define run settings
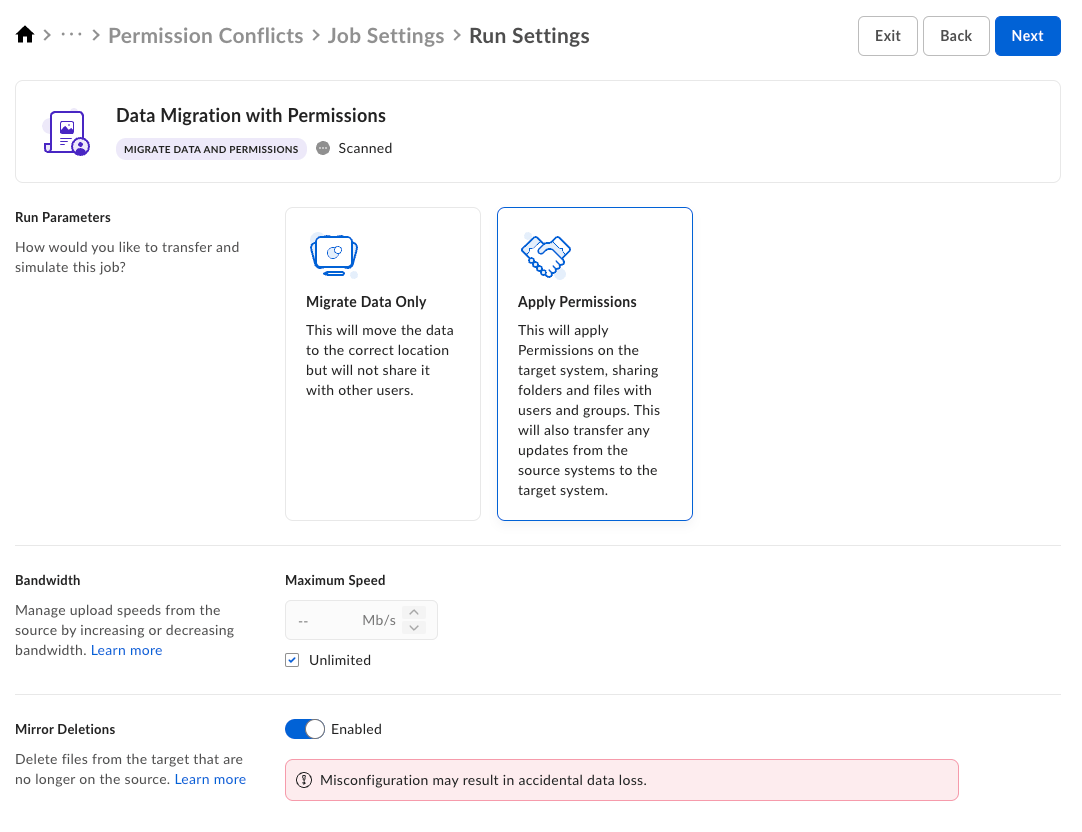
Define the following run settings:- Run Parameters: At this point you can still choose if you want to migrate your data only or apply permissions to the chosen files and folders. For migrations where you want to migrate all data to Box before Box collaborators have access to it, you can run a job as Migrate Data Only and then switch the mode to Apply Permissions for the final run.
- Bandwidth (for Windows sources only): Specify the maximum upload speed, or select Unlimited.
- Mirror Deletions: Specify if you want to delete the files from the target location if they are no longer available in the source.
Verify data
During the pre-run validation you can see the summary including the data you want to migrate and the job settings to verify if they are correct before proceeding with the migration. To make changes, select the breadcrumbs menu at the top to go back to the part you want to change.Run simulation
Simulations give you an estimate on runtime and check for potential issues or errors before you migrate your data. This is an important step to validate your migration configuration, and Box recommends running a simulation before performing a transfer to encourage positive migration outcomes. Some simulation incompatibilities for Box include files larger than the maximum size supported and filtered system files, such as thumbs.db or other similar extensions. Simulations detect many, but not all, of the potential errors in a transfer job.When to run a simulation
- After setting up your first job
- When you make job configuration changes
- If data on your source or Box target changes significantly, including data being moved or renamed
- Before migrating permissions
- Identifies the size of content on the source, the number of files, and total bytes.
- Assesses how many files and bytes transfer during synchronization runs, and identifies which files transfer during the sync. This is helpful for evaluating whether to run the sync.
- Identifies and troubleshoots transfer errors quickly, such as Access denied, when comparing results to a direct transfer. Simulation jobs also help evaluate drive and network connectivity problems.
- Provides an estimated time to complete a data migration, and potential congestion issues impacting transfer speed.
This estimate is a guideline only. The actual transfer might take more or less time depending on a number of factors.After the simulation is done, you can view the results by selecting View Job Report. See Reporting for more details.
Run transfer
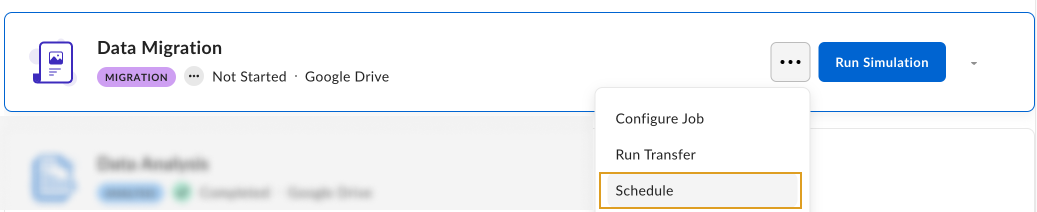
Selecting Run Transfer starts the migration process. After it is finished, you can examine the results. After the transfer is done, you can view the results by selecting View Job Report. See Reporting for details.Schedule migration
You can schedule a job to run at a given time and re-run it at configurable intervals.For a Windows source system, the scheduler runs only one job at a time. This ensures that each job has sufficient memory, CPU, and other resources to transfer data to Box at optimal speeds.