> ## Documentation Index
> Fetch the complete documentation index at: https://docs.box.com/llms.txt
> Use this file to discover all available pages before exploring further.

# Manage Account Settings

<div className="article_labels_list" style={{display: 'none'}} dangerouslySetInnerHTML={{__html: "has_image , End User , Single Sign On , Best Practices , 2fa , Article , New , Account Administration , Instruction"}} />

The **Account Settings** page is where you modify the default settings for your account, change your account information or view log in activity. These settings apply only to your account, and if you are part of a Business or Enterprise organization, can be overridden by the settings set by an enterprise account administrator.

<h2 id="account-tab">
  Account Tab
</h2>

The Account tab contains the basic account settings for your account.

<h3 id="general-options">
  General Options
</h3>

The General Options section contains settings for basic account operation.

| Setting                                     | Description                                                                                                                                                                                                                                                                                                                                                                                                                                                                                                                                                                                                                         |
| ------------------------------------------- | ----------------------------------------------------------------------------------------------------------------------------------------------------------------------------------------------------------------------------------------------------------------------------------------------------------------------------------------------------------------------------------------------------------------------------------------------------------------------------------------------------------------------------------------------------------------------------------------------------------------------------------- |
| <strong>Home Page</strong>                  | Determines the default home page of your Box account, the first page you see when you log in. Select from:<br /><br />• Files (default)<br />• Favorites<br />• <a href="/en/box-fundamentals/for-users/staying-organized/organizing-and-tracking-content/using-recents">Recents</a><br />• <a href="/en/box-admin-tools/how-to-guides-for-admins/admin-console-guide">Admin Console</a> (Available only if you are part of a Business or Enterprise organization and you are an Admin or Co-admin.)<br />• <a href="/en/box-fundamentals/for-users/staying-organized/managing-files-and-folders/using-collections">Collections</a> |
| <strong>Files and Folders per Page</strong> | Determines the number of files and folders displayed on pages other than the Files page. (The Files page provides infinite scroll.) Select from:<br /><br />• 20 (default)<br />• 50<br />• 75<br />• 100<br />Selecting a larger number can make it easier to scroll through files, but can increase download time, depending on the speed of your network.                                                                                                                                                                                                                                                                        |
| <strong>Time Zone</strong>                  | Defines the time zone in which you are located.                                                                                                                                                                                                                                                                                                                                                                                                                                                                                                                                                                                     |
| <strong>Language</strong>                   | Defines the language used in your account. for the Box user interface.                                                                                                                                                                                                                                                                                                                                                                                                                                                                                                                                                              |
| <strong>Display Item Tags</strong>          | Determines whether you see <a href="/en/box-fundamentals/for-users/staying-organized/organizing-and-tracking-content/using-tags">tags</a> on files and folders.                                                                                                                                                                                                                                                                                                                                                                                                                                                                     |

<h3 id="admin-options">
  Admin Options
</h3>

Available only for the user who is the administrator for an enterprise, this contains a **Business Settings** button that take the admin directly to the Account & Billing section of the Admin Console, where you can purchase more seats or upgrade your account.

<h3 id="login-and-email-addresses">
  Login and Email Addresses
</h3>

The Login and Email Addresses section contains your default email address, as well as any additional email addresses you've added to your account. In this section, you can update your email address. You can also link multiple email addresses to the same account in Box. Any collaboration invites that go to these secondary email addresses (or Email Aliases) will get funneled into your primary Box account. This also prevents anyone from creating a new Box account using that email address. Other users only see your primary email address and all notifications from Box continue to be sent to your primary address. You can also use the secondary email to log in if the single sign-on feature is configured to look for the secondary email instead of the primary email.

**To add an email address:**

1. Select one of the following options:
   * For paid accounts, click **Link Email**.
   * For free accounts, click **Link Personal Email**.
2. Enter a valid email address.
3. Click **Save**.

An email verification will be sent to the address you entered. Click the verification link in the email to confirm and add the alternate email to you account.

<Warning>
  **Important**

  For security purposes, the verification email for Admin and Co-admin users will be sent to their existing primary email address, not the newly entered email address.
</Warning>

**To make a secondary email address your primary email address:**

* Click **Make Primary** next to the email address you want as your primary email address.

If you do not see this option, it's likely your enterprise has a feature enabled, such as [SSO](/en/box-admin-tools/box-security/setting-up-single-sign-on-sso-for-your-organization), that prevents users from changing their primary email address. In that case, you need to reach out to your primary admin for assistance. See [Changing an Email Address for a Single Sign-On Account](https://support.box.com/hc/en-us/articles/360043692934) for details.

<Warning>
  **Important**

  For security purposes, Admin and Co-admin users are prevented from making a secondary email address from a public domain (such as Gmail or Yahoo) or an unverified domain their primary email address.
</Warning>

**To remove an email address:**

1. Click **Remove** next to the email address you want to remove.
2. In the confirmation dialog box, click **Okay**.

<h3 id="authentication">
  Authentication
</h3>

The Authentication section contains your current password, obfuscated for security.

If you do not have a password defined, you can [create a password](/en/box-fundamentals/for-users/user-login-and-settings/creating-a-password). To change your password, see [Changing Your Password](/en/box-fundamentals/for-users/user-login-and-settings/changing-your-password). If you are unable to log in to change your password, you can [reset your password](/en/box-fundamentals/for-users/user-login-and-settings/reset-my-box-account-password).

<h3 id="2-step-verification">
  2-Step Verification
</h3>

The 2-Step Verification section is where you can enable and configure 2-Factor Authentication (2FA) for your account.

<Note>
  **Note**

  If your account has Single Sign On (SSO) required, you will not be able to turn on 2-step verification.
</Note>

See [Multi-Factor Authentication Set Up for Your Account](/en/box-fundamentals/for-users/user-login-and-settings/multi-factor-authentication-set-up-for-your-account) to learn about this feature.

After the initial successful login, Box will remember the browser and you will not be prompted for 2FA if you need to log in again. Only clearing the browser's cache and cookies will re-prompt 2FA.

<h3 id="account-details">
  Account Details
</h3>

The Account Details section information about your Box account, including:

* **Account type** - Individual, Business, Enterprise, etc.
* **Account ID** - The unique identifier for your account
* **Storage Used** - How much storage you are using currently on Box, in megabytes (MB) and how much storage your account is allocated
* **Max File Size** - The largest file you can upload to Box
* **Login Address** - The direct URL you can use to login to Box
* **Admin Contact** - If you are in a Business or Enterprise account, the email address of your primary administrator

If you are a Business or Enterprise customer and an administrator of the organization, you may also see a Upgrade Your Account button to enable you to upgrade or add features. If you are an individual account, you may also see a Permanently Delete Account link.

<h2 id="sharing-tab">
  Sharing Tab
</h2>

The Sharing tab is where you configure how you share your content and the default settings for sharing.

<h3 id="shared-links">
  Shared Links
</h3>

The Shared Links section contains default settings for shared links. These settings will only apply to shared links created on content you own.

<table><thead><tr><th>Setting</th><th>Description</th></tr></thead><tbody><tr><td><strong>Allow Shared Links for</strong></td><td><p>Defines the content type you allow to be shared. Select from:</p><ul><li><strong>Folders and files</strong> (default) - All content in your account use the shared link settings that follow this option.</li><li><strong>Folders only</strong> - Folders in your account use the shared link settings that follow. Shared links for files can be created, but are accessible only by invited collaborators in the folder.</li><li><strong>Files only</strong> - Files in your account use the shared link settings that follow. Shared links for folders can be created, but are accessible only by invited collaborators in the folder.</li><li><strong>Nothing, restrict sharing</strong> - Disables shared links for everyone except invited collaborators to the file or folder.</li></ul><div><p><strong>Note</strong></p><p>You can share only content you own.</p></div></td></tr><tr><td><strong>People who can access shared links</strong></td><td><p>Defines what access options are available for the content types selected above. By default, all options are enabled, meaning that you can choose, per item, what access permission to grant your content. Select from:</p><ul><li><strong>People with the link, people in your company, and people in this folder</strong> (default) - Anyone with the link can access. But you can still set a password or expiration date for these links. There is no login required.</li><li><strong>People in this folder only</strong> - Only people collaborating in this folder can access its content from a shared link.</li></ul><p>If you change this setting from a less restrictive setting to a more restrictive setting and then back again, shared links created before the setting changes retain their type.</p></td></tr><tr><td><strong>Default access for new links</strong></td><td><p>Defines the default access level of newly-created shared links. If you have limited the access options in an earlier setting, your options here are limited accordingly.</p><ul><li><strong>People with the link</strong> (default) - The content is open to people with the link. File viewers do not have to log in.</li><li><strong>People in this folder</strong> - Only people collaborating in this folder can access its content.</li></ul><p>You can still change the access type when you generate a shared link.</p></td></tr><tr><td><strong>Actions link recipients can take</strong></td><td><p>Defines the allowed and default permissions for file, folder, and Box Notes shared links. For files, folders, and Box Notes, you define both the maximum permission allowed and the default permission when users share links, and you select from the following values for each:</p><ul><li><strong>Preview, download, and edit the shared item</strong></li><li><strong>Preview the shared item only</strong></li></ul><p>For each part of these options:</p><ul><li>Preview means that link viewers can only preview the item. Download and edit is disabled. Managed users cannot toggle this setting at the folder and file level.</li><li>Download means that link viewers can download the files, folders, and Box Notes. With this option enabled, you can toggle the download setting at the folder and file level.</li><li>Edit means that link viewers can edit the linked file, files in the linked folder, or the Box Note. More specifically, editable file sharing links are shared links that grant editing permissions to files stored in Box for people with those links. You will be able to select the edit option in the sharing modal for a file within Box if you include edit in the maximum permission allowed.</li></ul></td></tr></tbody></table>

<h3 id="collaborating-on-content">
  Collaborating on Content
</h3>

By default, your account is set to automatically accept invitations to collaborate. **Uncheck** the box under **Incoming Invitations** if you'd like to have the opportunity to accept or reject collaboration invitations.

<h3 id="uploading-content-box-accelerator">
  Uploading Content (Box Accelerator)
</h3>

Box Accelerator is a global data transfer network that improves the speed of your uploads. If you’re having issues with uploads, try turning this off. If your uploads seem slow, you may have a problem with your network or firewall. See [Troubleshooting: Uploads](https://support.box.com/hc/en-us/articles/360044196773) for more information.

<Note>
  **Note**

  This setting is available only to managed users in organizations with Business or Enterprise accounts.
</Note>

<h2 id="notifications-tab">
  Notifications Tab
</h2>

The Notification tab is where you configure what you get notified for and how to get notified.

<h3 id="email-notifications">
  Email Notifications
</h3>

The Email Notifications section is where you define for which Box events you are notified.

Email notifications for Co-owners is controlled by **In Items I Own** checkboxes.

For both folders you own and folders you've joined (in which you are a collaborator), you can get notified for:

* Downloads
* Uploads
* Comments (the default is selected for folders you own)
* Previews
* Deletes (the default is selected for folders you own)

Previewing and editing a Box Note in a folder you own or a folder you joined does not generate email notifications.

If you are a member of an organization, email notifications can also be adjusted at enterprise-wide, account-wide, and folder specific levels.

* [**Enterprise-wide email notifications**](/en/box-admin-tools/how-to-guides-for-admins/manage-notifications-for-enterprise-users.mdx): When email notifications are applied in the Admin Console, it will be the default for all newly created end users until the end user adjusts their settings.
* **Account-wide email notifications**: When email notifications are applied in the Account Settings, it will be the default notification setting for all newly created folders in the account OR for folders that are set to "Use my default notification settings".
* End users in a Box instance can have different account wide settings by manually adjusting their email notification settings.
* [**Folder specific level email notifications**](/en/box-fundamentals/for-users/staying-organized/managing-files-and-folders/box-folder-settings#email-and-notifications-settings): When email notifications are applied in the Folder Settings, it will be the default email notifications for all files in the folder and subfolders. Please note that you cannot trigger email notifications to yourself for actions you triggered.
* Different users collaborating in a folder can set their own specific Folder level email notifications (if allowed by the folder owner).

If you are not receiving email notifications as expected, please follow the steps in our [Troubleshooting Issues with Email Notifications](https://support.box.com/hc/en-us/articles/360043696174) article .

<h3 id="general-emails-and-notifications">
  General Emails and Notifications
</h3>

The General Emails and Notifications section is where you can control the emails you will receive from Box. You can choose to receive the following email:

* Login Activity: Get notified when your account is accessed from a new device.
* Shuttle Activity: Get notified about results of Shuttle jobs.

The default state for this setting when accounts are created is enabled.

<h3 id="app-notifications">
  App Notifications
</h3>

The App Notifications section is where you can enable receiving Box notifications in any third-party apps for which you have enabled integrations and that can receive those notifications.

<Note>
  **Note**

  This section is available only if you are part of an organization that includes integrations with third-party apps.
</Note>

<h2 id="security-tab">
  Security Tab
</h2>

The Security tab is where you get information about your account security.

<h3 id="login-activity">
  Login Activity
</h3>

The Login Activity section of your Account Settings is useful for monitoring access to your Box account. You will see a list of all the applications, devices, and locations you've used to log in to Box.

<Frame>
  <img src="https://mintcdn.com/product-docs/eEZ2SZ8FKaSHD273/images/box-fundamentals/account-settings-5.png?fit=max&auto=format&n=eEZ2SZ8FKaSHD273&q=85&s=94d7bf73cbeff07473c8d73d1bc327a8" alt="Account Settings 5" width="999" height="389" data-path="images/box-fundamentals/account-settings-5.png" />
</Frame>

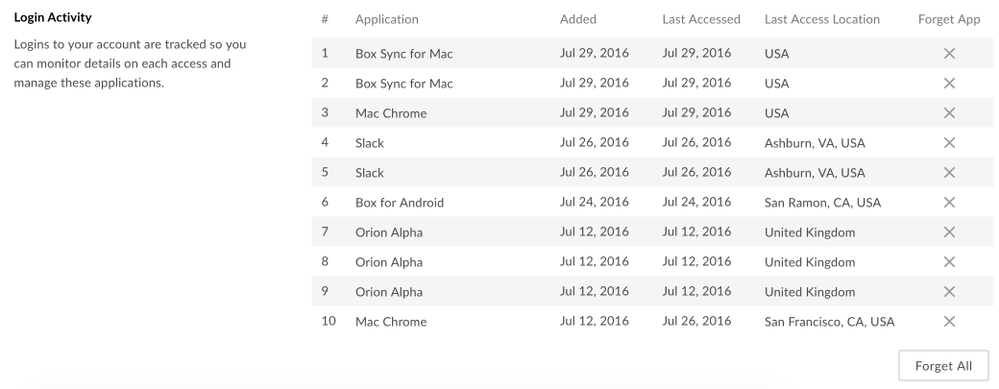
Click the **X** next to a session to **forget** this mode of access. You can also click the **Forget All** button at the bottom of the page to forget all sessions. The next time someone tries to open this application or browser from your stolen device, they will be prompted to re-enter their Box login credentials.

<h2 id="profile-tab">
  Profile Tab
</h2>

The profile tab contains information about your profile, including your name, profile picture, and contact information.

<h3 id="user-profile">
  User Profile
</h3>

The User Profile section lists the information you enter about your profile.

**To edit your profile information**

1. Click into one of the text boxes.
2. Make any desired changes.
3. Click **Save Changes**.

**To change your profile picture**

* Click **Change.**
* Select the image you would like to use from the file browser
* Click **Open**.

**To remove your profile picture**

* Click **Remove**.

<h2 id="diagnostics-tab">
  Diagnostics Tab
</h2>

The diagnostics tab is useful when you encounter a problem with Box. Run a **Connection Diagnostics** test to check the status of your connection to Box.

If you have filed a support ticket with Box, you may be asked to grant Box access to your account. You can do so by clicking the **Grant Access** button in the **Access to your Account** section. This will give Box Support access to your account for 5 calendar days. At the end of 5 days, access will automatically be revoked. You can manually revoke access at any time. To determine if you need to grant Box access to your account for support, please contact your administrator or customer success manager.
