> ## Documentation Index
> Fetch the complete documentation index at: https://docs.box.com/llms.txt
> Use this file to discover all available pages before exploring further.
# SharePoint Server
This document describes an [advanced tool](/en/box-shuttle/about-box-shuttle/box-shuttle-standard-and-advanced-tooling) that is not available to all users by default.
To connect SharePoint Server as a source system, you need to perform the following steps:
* [Download Windows Agent](#download-windows-agent) to your machine.
* [Register Windows Agent](#register-windows-agent) and authenticate Box Shuttle using the provided key.
* [Provide SharePoint Site URL](#set-up-connection-with-sharepoint) or, when you don’t use Windows integrated authentication, use your SharePoint credentials.
## Set up Windows Agent
## System requirements
Windows Agent supports the following SharePoint versions:
* SharePoint 2013 or higher
The system requirements you need to fulfill are as follows:
| | | |
| ------------------- | ------- | -------------- |
| **Number of cores** | **RAM** | **Disk space** |
| 4 | 8 GB | 50GB |
For Windows machines that are running concurrent jobs, conservatively, it is recommended to run one job per 1.5 cores and 4 GB of RAM. In other words, an 8-core 16-GB machine can run 4 concurrent jobs, and an 8-core 32-GB machine can run 6 concurrent jobs.Larger jobs with more files or more complex permissions may require more than the minimum system requirements.
Download Windows Agent
1. In Shuttle, click **New Job** and provide a unique name for the analysis or migration job.
2. Select **SharePointServer**.
Enter the **Agent Name**.
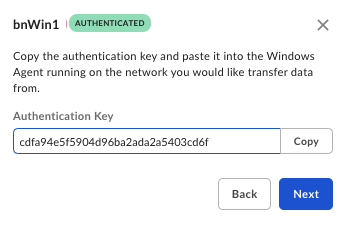
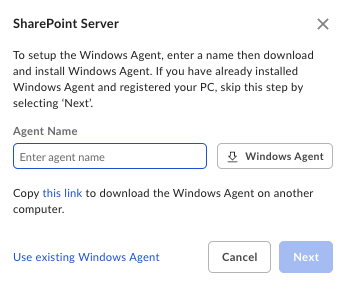 Click **Next** and copy the **Authentication Key.** You will need it to register the Windows Agent.
Register Windows Agent
1. Install Windows Agent.
2. In the pop-up window, provide the **Agent Key** you have copied before the installation and confirm. It may take some time to configure and register the Agent.
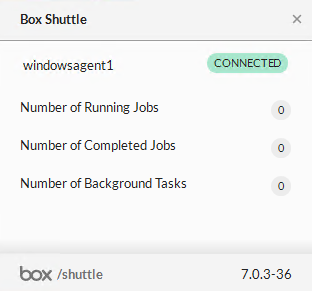
3. Once the registration finishes, Windows Agent will appear as connected. You can now proceed with data analysis or migration.
 Windows Agent must be able to connect to the Shuttle service and other Box services to correctly list and migrate data. This means that the network on which the Windows Agent is running must be configured to allow that traffic.
If you encounter any issues while working with Windows Agent, see [Troubleshooting Windows Agent](https://support.box.com/hc/en-us/articles/16335536508307) documentation.
Windows Agent must be able to connect to the Shuttle service and other Box services to correctly list and migrate data. This means that the network on which the Windows Agent is running must be configured to allow that traffic.
If you encounter any issues while working with Windows Agent, see [Troubleshooting Windows Agent](https://support.box.com/hc/en-us/articles/16335536508307) documentation.
Set up connection with SharePoint
Once you have registered Windows Agent, click Next in the main Source System configuration window.
At this point, provide the SharePoint Site URL:
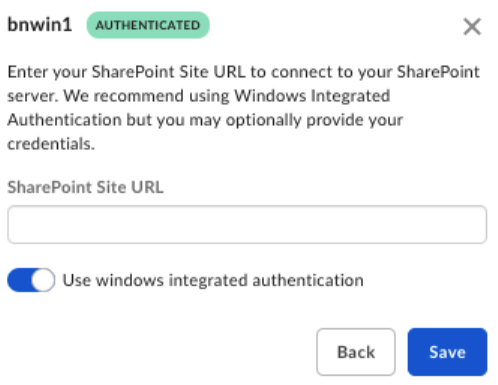 You can also deactivate windows integrated authentication and use your credentials:
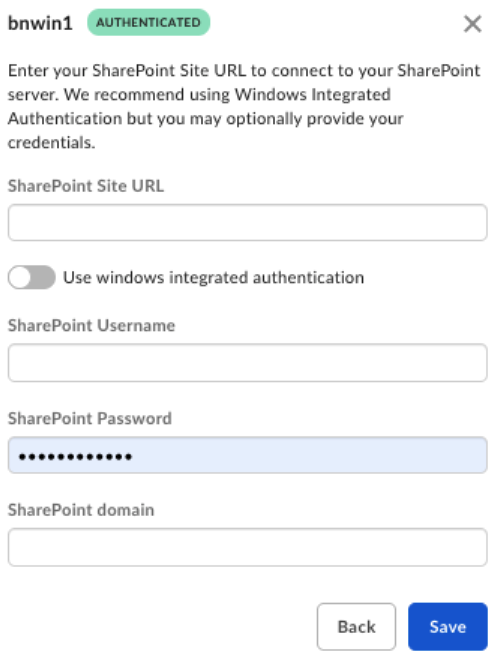 SharePoint sites vary in terms of how credentials are entered. You’ll need to enter the SharePoint site URL in almost all instances, but in some cases, entering **Username** as `domain\Username` and leaving the SharePoint domain field blank works best. For other cases, the system will validate if you only added the Username, and then add the domain in the SharePoint domain field.