
 2. If you don’t have a project, click **New Project**.
3. Add your Project name, Project ID, Organization, and Location.
2. If you don’t have a project, click **New Project**.
3. Add your Project name, Project ID, Organization, and Location.
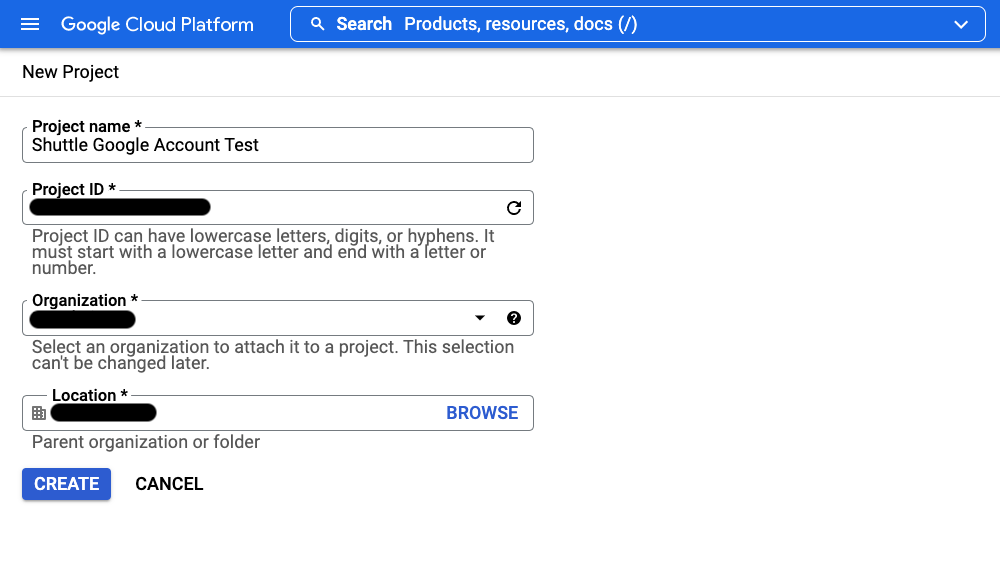 4. Click **Create** to continue.\
**Note**: If you already have a project, editing your Project ID is optional and not recommended.
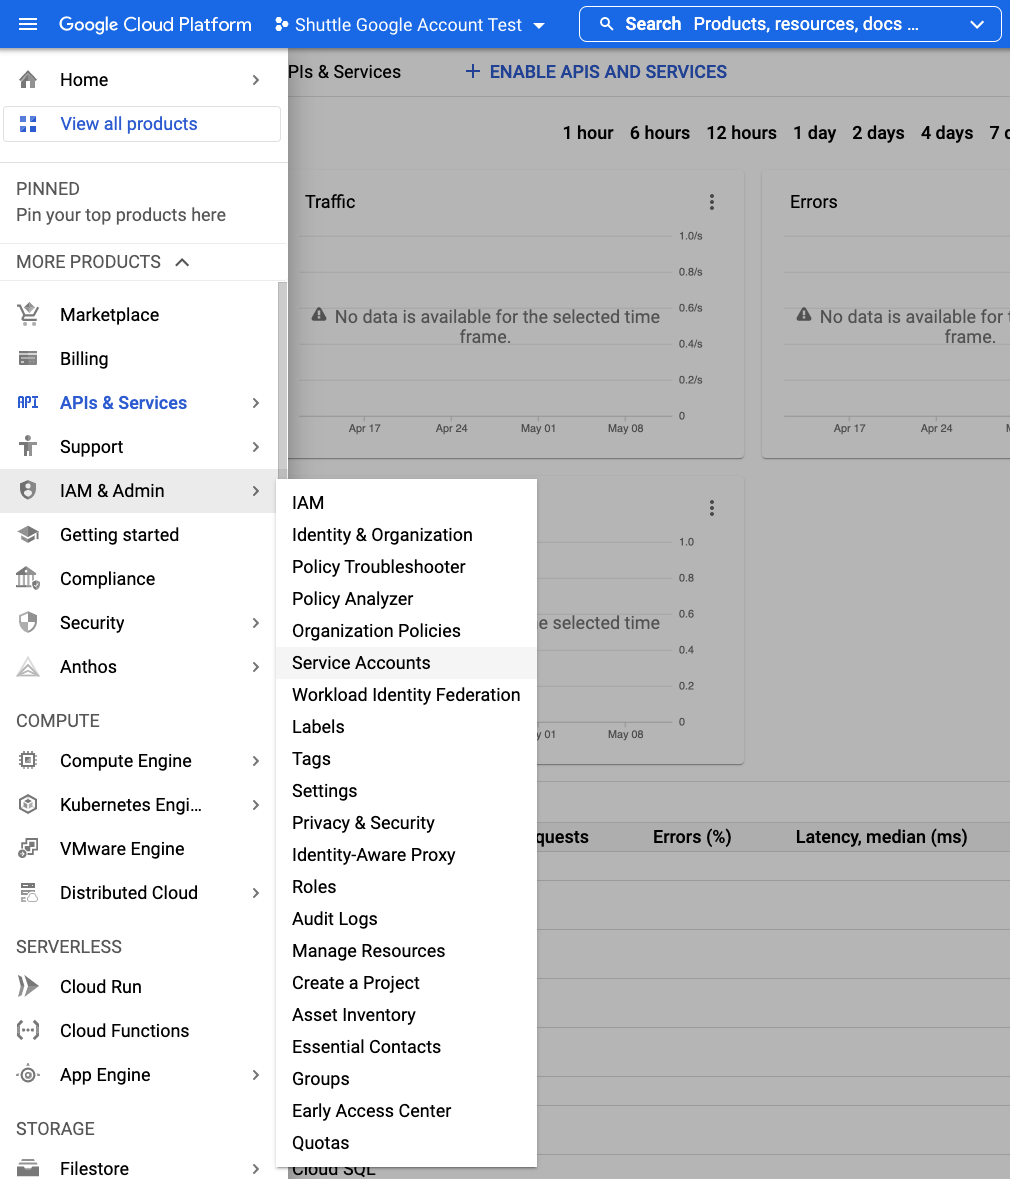
5. Open the Google Cloud Platform menu and navigate to **IAM & Admin**.
6. Click on **Service Accounts** in the pop up.
4. Click **Create** to continue.\
**Note**: If you already have a project, editing your Project ID is optional and not recommended.
5. Open the Google Cloud Platform menu and navigate to **IAM & Admin**.
6. Click on **Service Accounts** in the pop up.
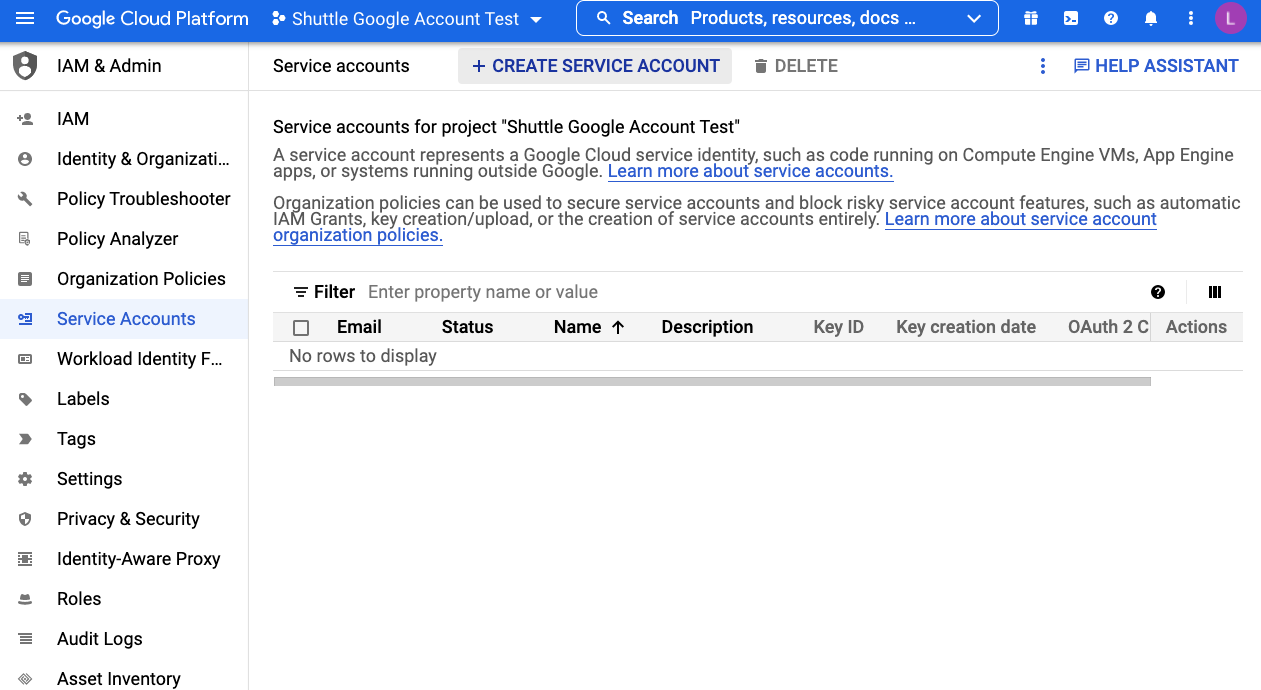
 7. On the Service accounts page, click **+ Create Service Account**.
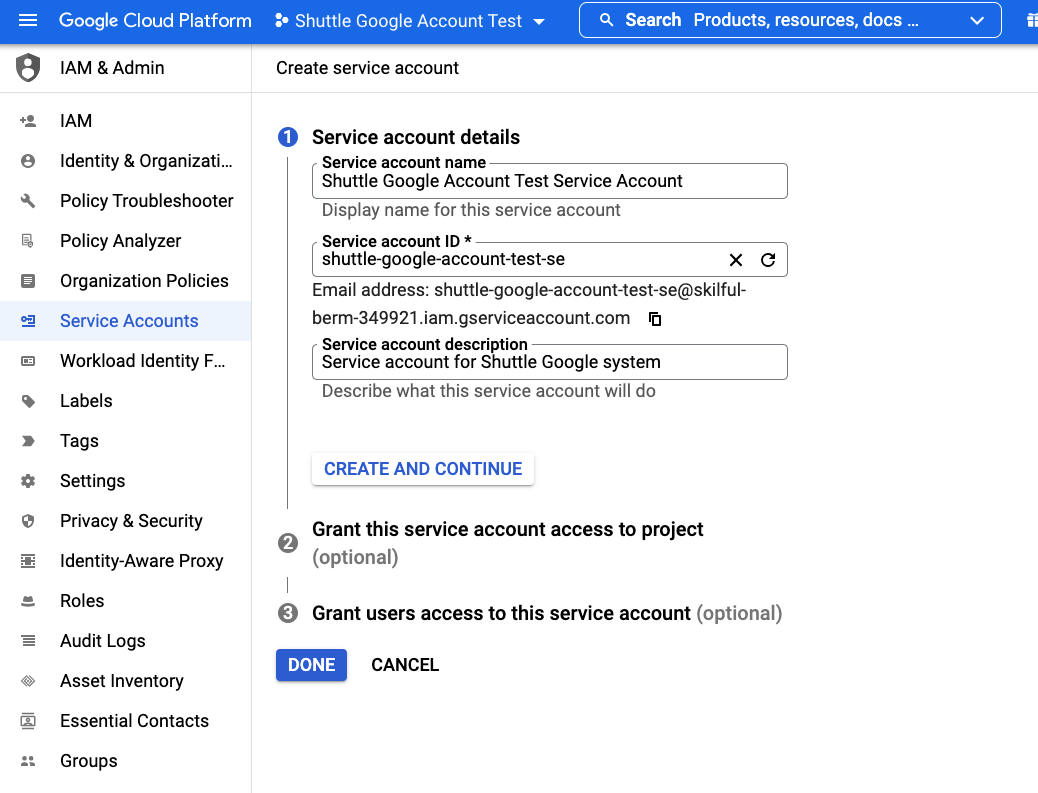
 8. Add and confirm your service account information, then click **Create and Continue**. Click **Done** to return to the Service accounts page.\
Granting project access and user access options are optional.
8. Add and confirm your service account information, then click **Create and Continue**. Click **Done** to return to the Service accounts page.\
Granting project access and user access options are optional.
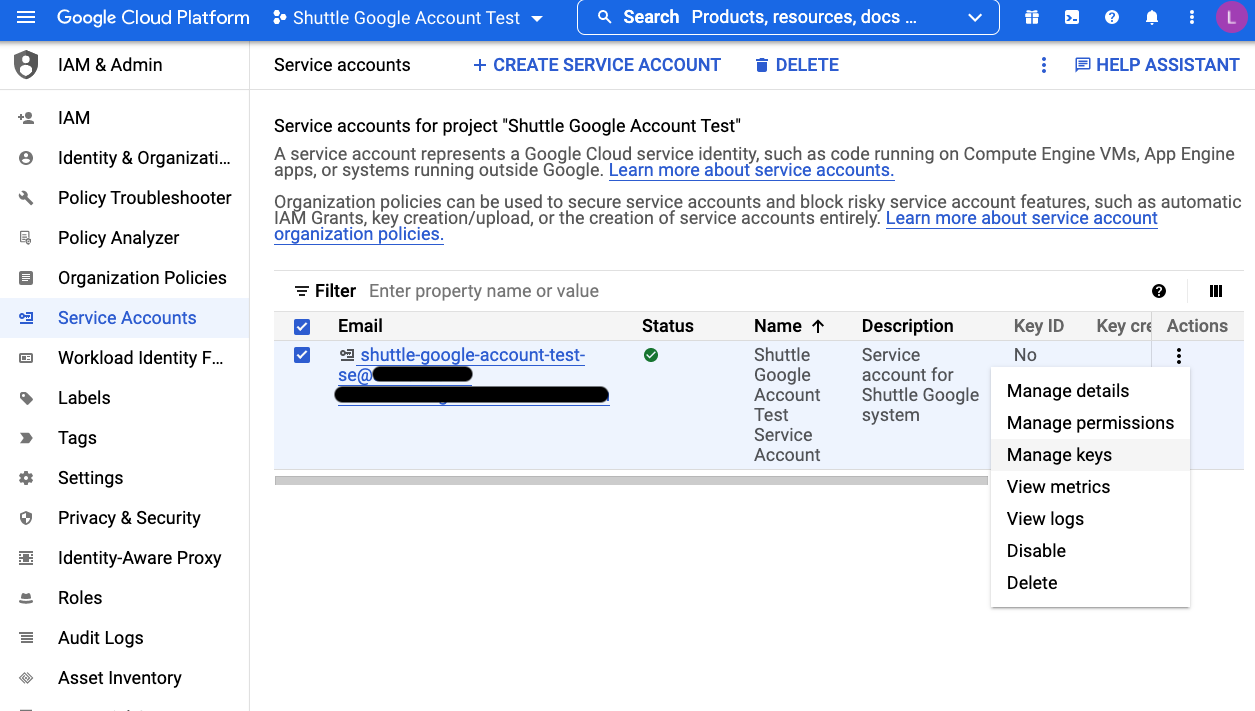
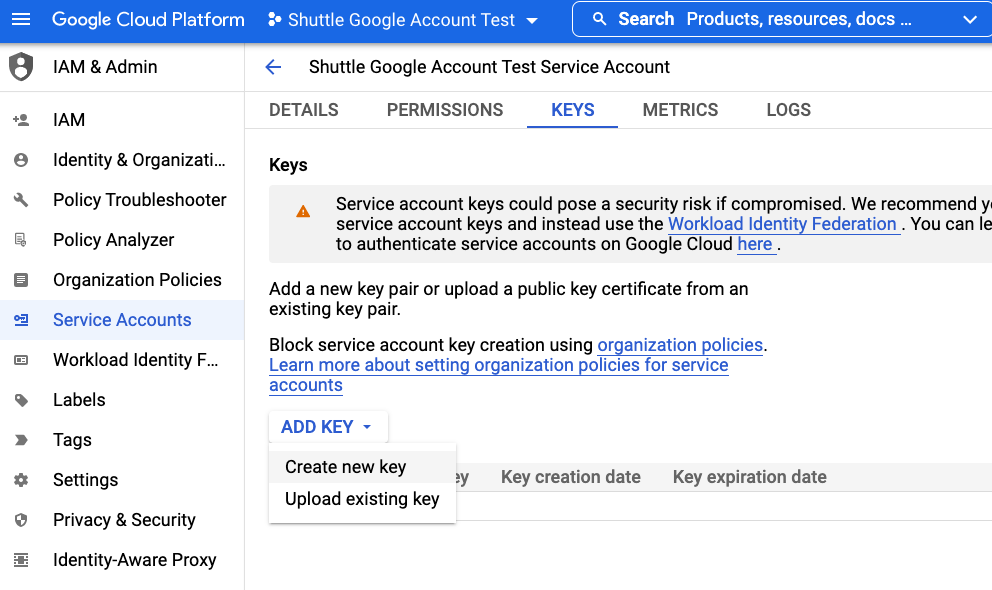
 9. On the Service accounts page, select the new service account from the previous step. Click the three dot icon in the **Actions** column. Click **Manage keys**.
 10. In the Keys tab, click **Add Key**. Then, click **Create new key** in the drop down menu.
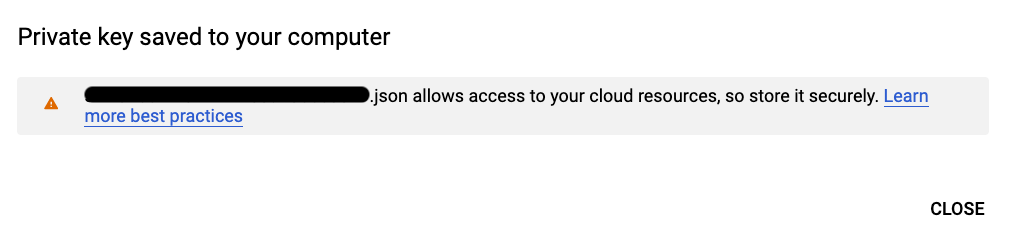
 11. The prompt gives you two options for downloading a file with the private key. Select the **JSON** key type. Click **Create** to download a JSON file to your device.
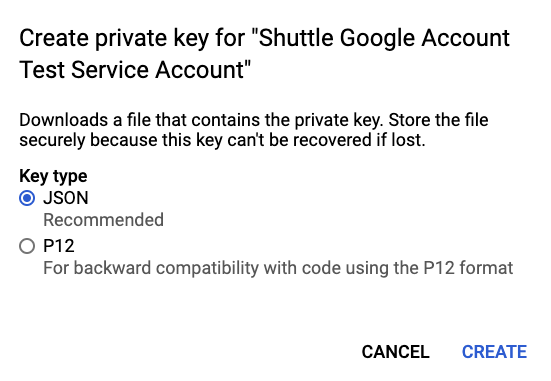 12. Save this file in a secure location. It is required for next steps.
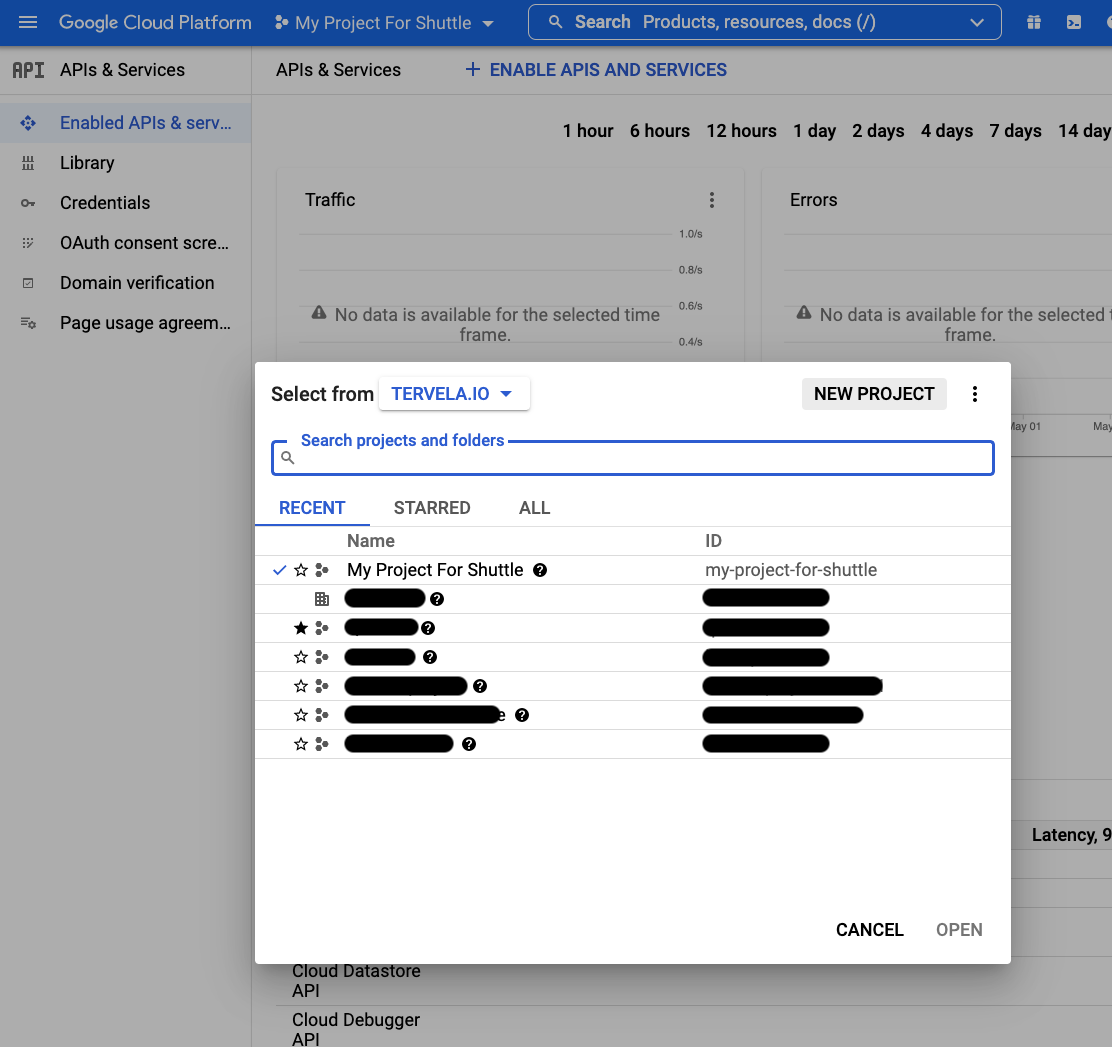
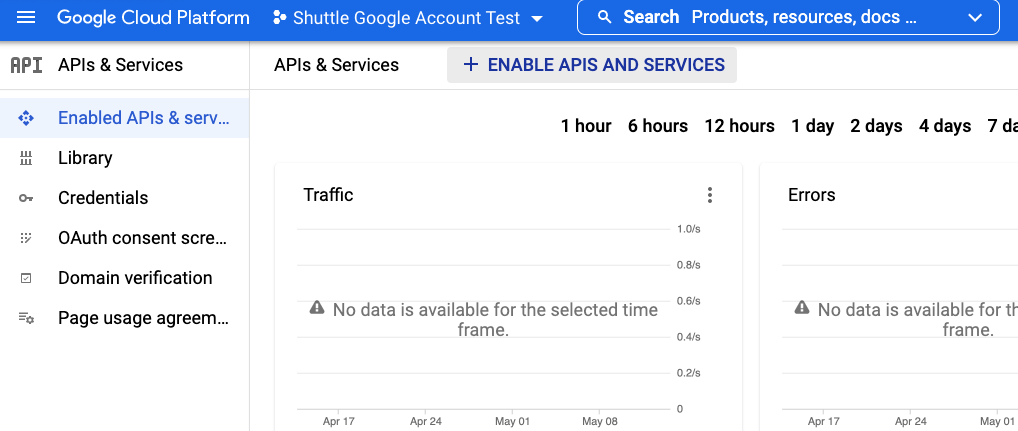
 13. Go to **API & Services** > **Enabled APIs & services** on the left from the pop up menu.
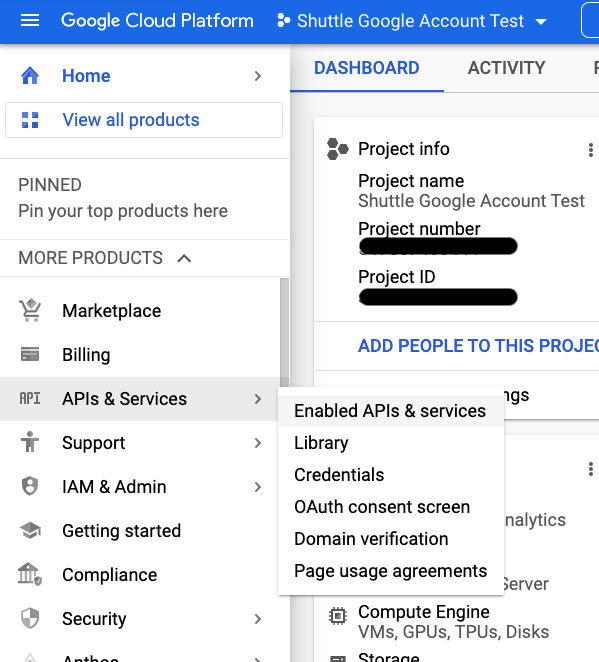 14. On the APIs & Services page, click **+ Enable APIs and Services**.
 15. On the API Library page, use the search bar to find the **Admin SDK** and **Google Drive API** to add. Click the appropriate result to continue to the next page.
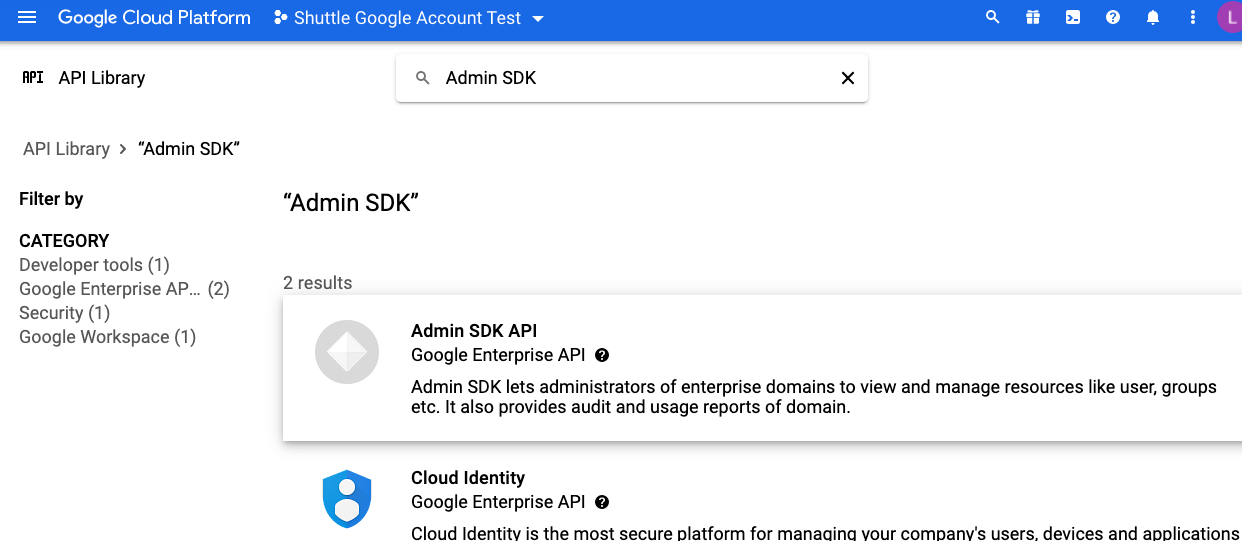 16. When adding the APIs, click **Enable**. This brings you to the specific API page. Navigate back to the API Library by clicking **API/Service Details** above the API title and icon.
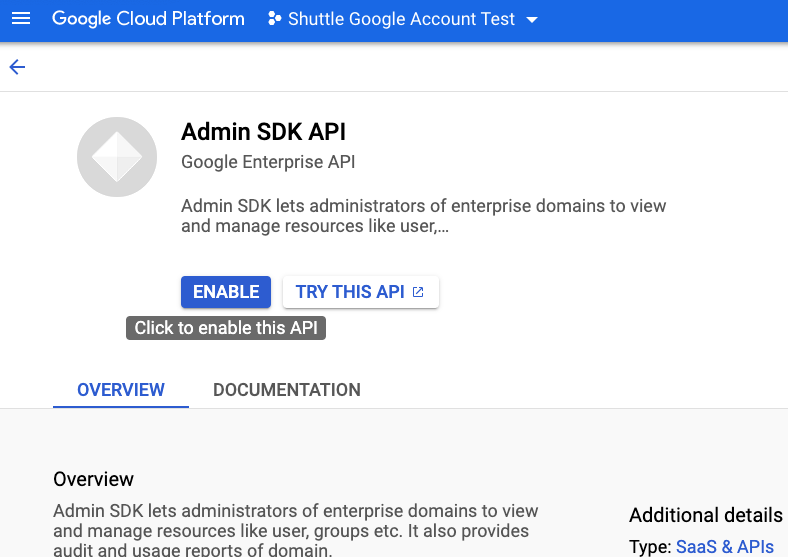 17. Repeat Steps 15 and 16 for the Google Drive API.
## Adjust Google Admin settings
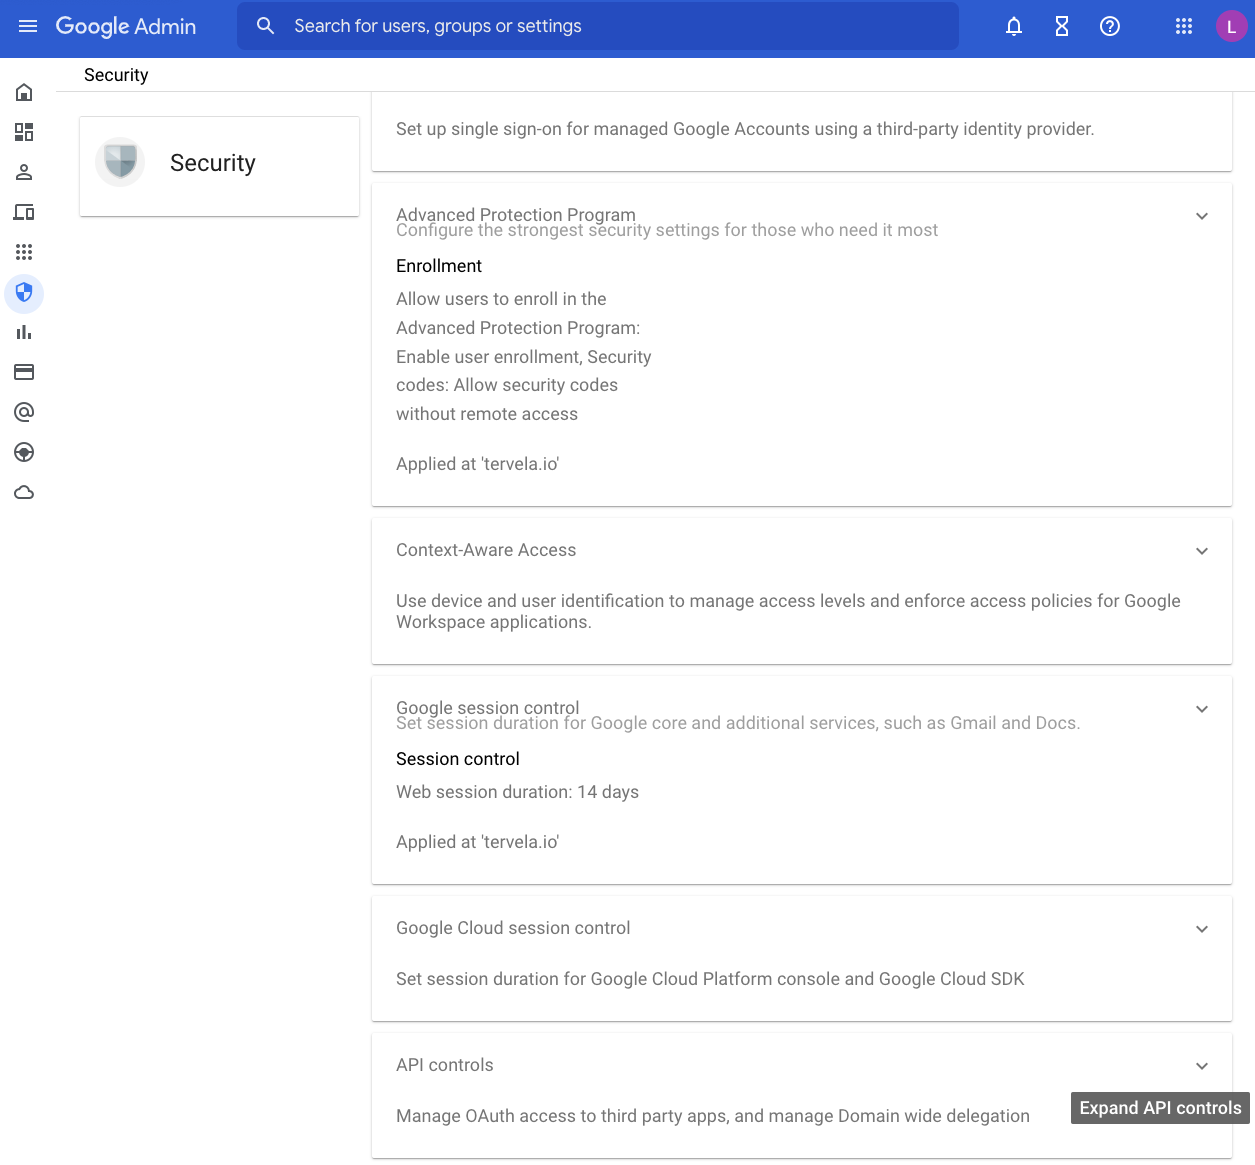
1. Go to your Google Admin page. Scroll down and click **Security**.
17. Repeat Steps 15 and 16 for the Google Drive API.
## Adjust Google Admin settings
1. Go to your Google Admin page. Scroll down and click **Security**.
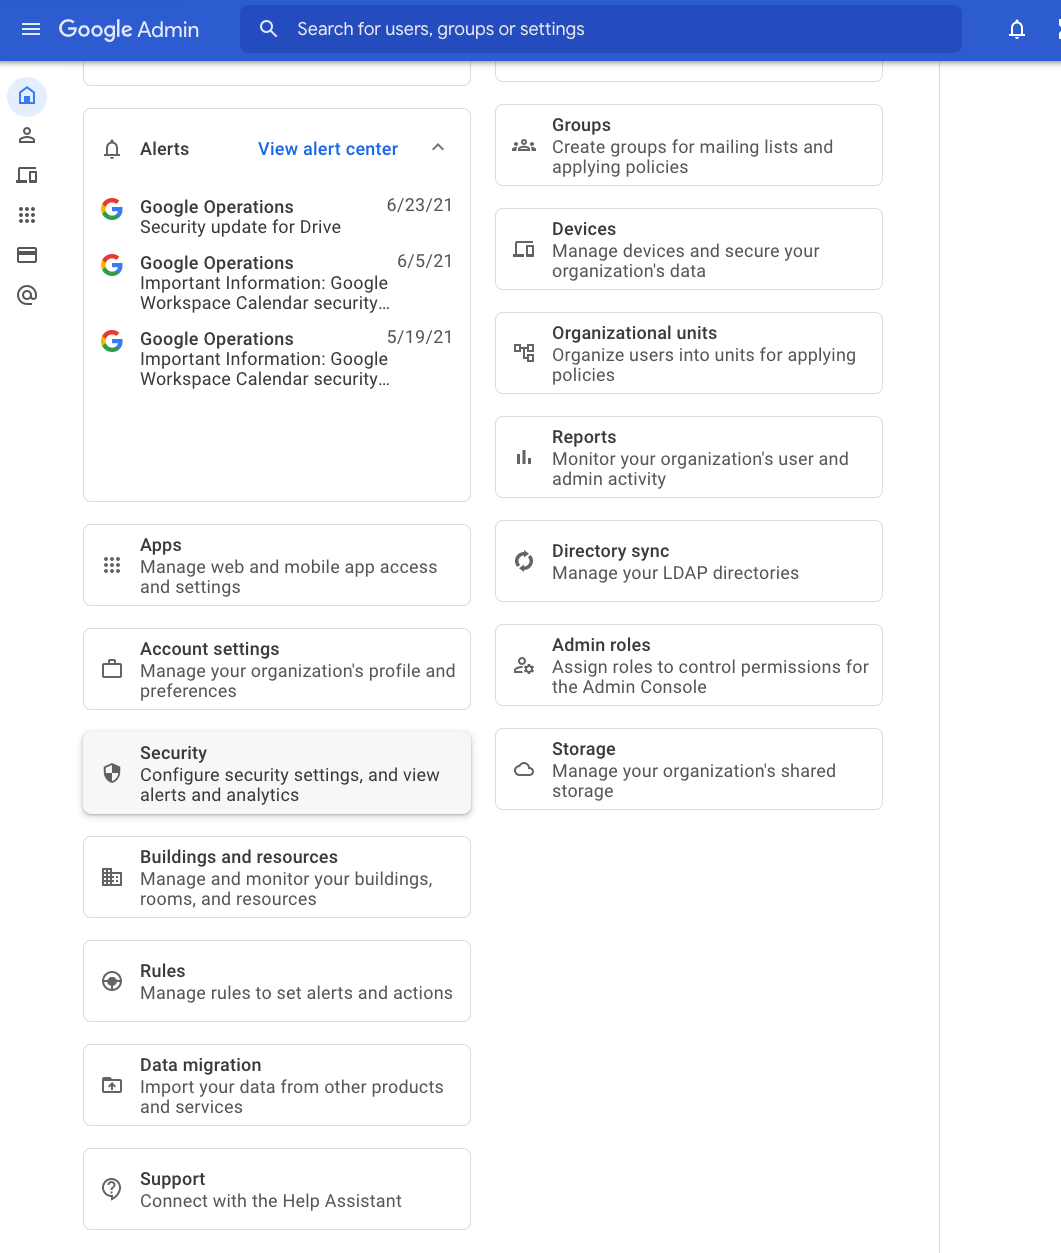 2. At the Security page, scroll down and click **API controls**.
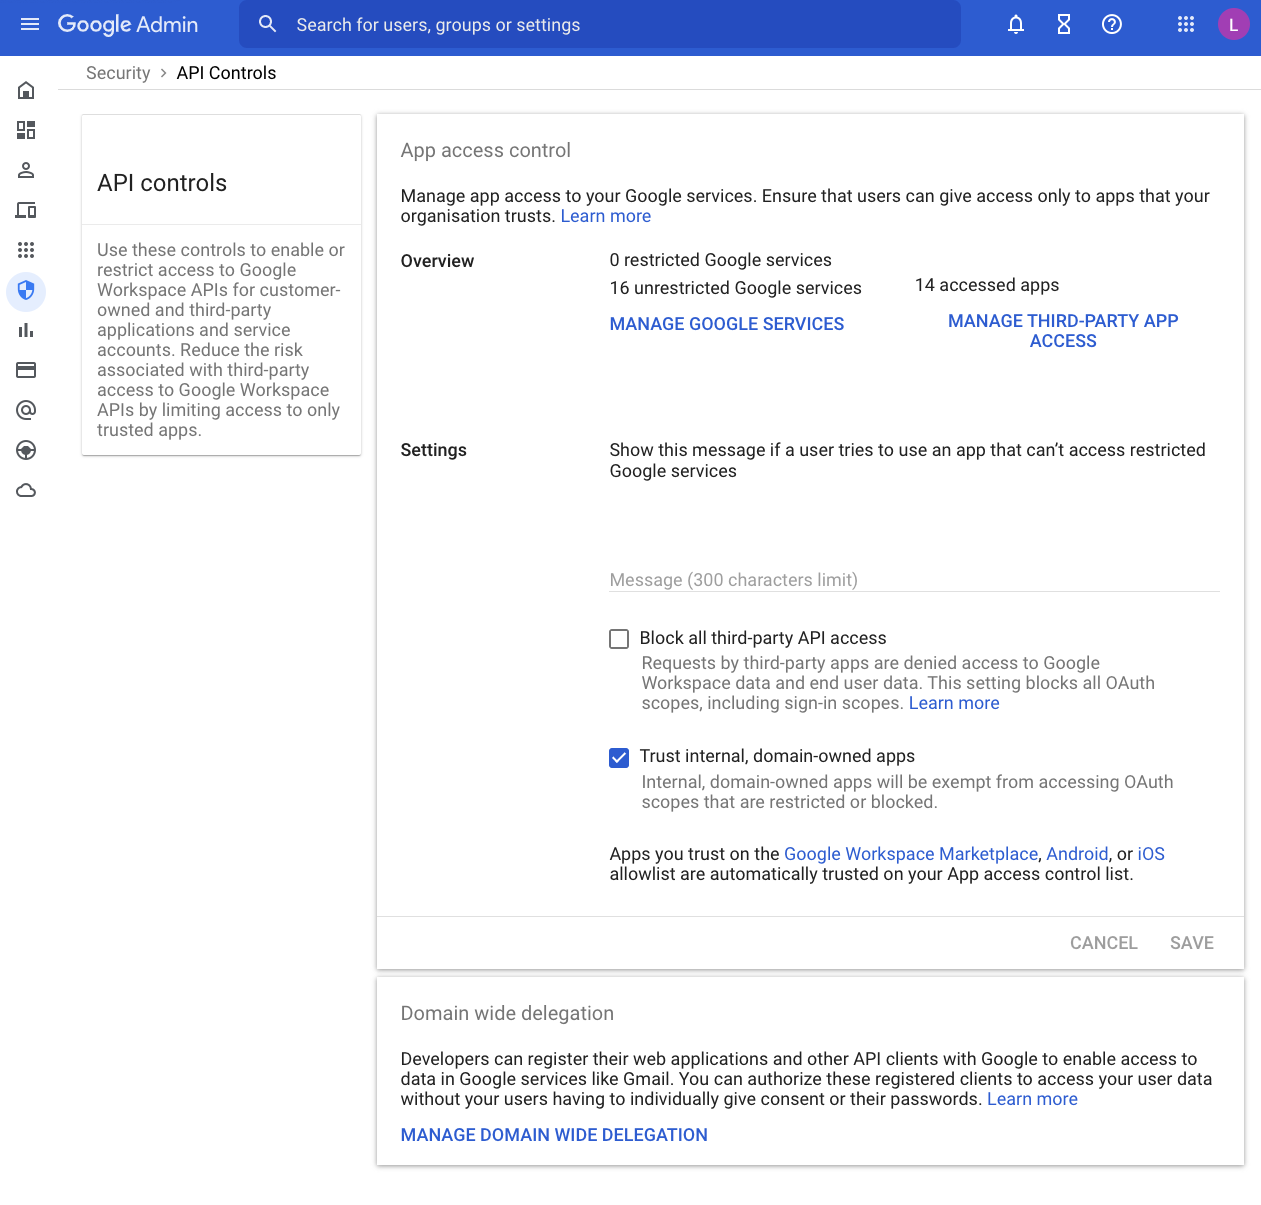
 3. At the API controls page, scroll down to **Domain wide delegation**. Click **Manage Domain Wide Delegation**.
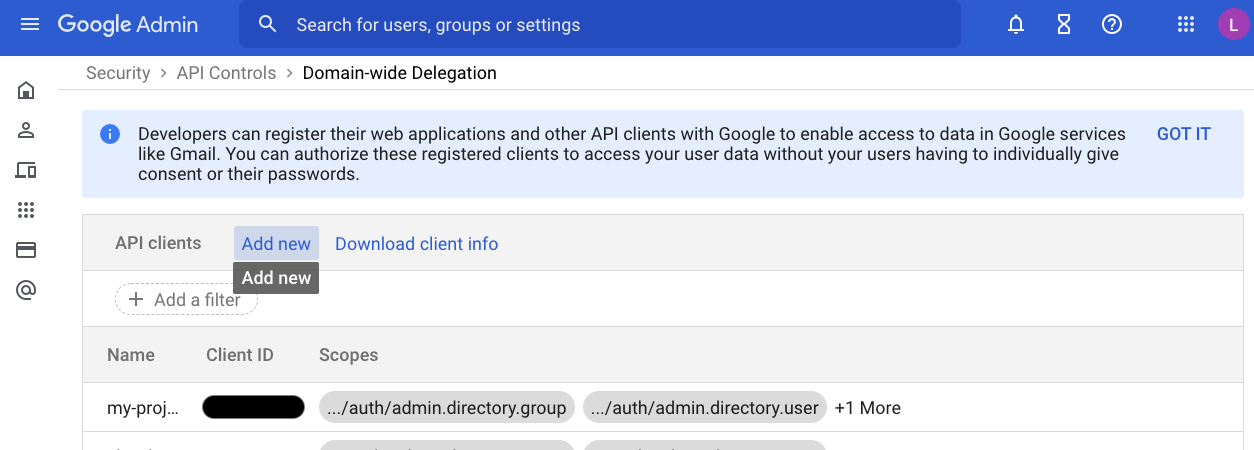
 4. On the Domain-wide Delegation page, click **Add New** in the API clients table for the **Add a new client ID** prompt.
 5. Open the JSON file you have saved before. Copy the **Client ID** value from the file. Paste the value in the **Client ID** field in the prompt.
6. In the **OAuth scopes (comma-delimited)** field, paste the string in the field from the prompt:\
[https://www.googleapis.com/auth/admin.directory.group,https://www.googleapis.com/auth/admin.directory.user,https://www.googleapis.com/auth/drive](https://www.googleapis.com/auth/admin.directory.group,https://www.googleapis.com/auth/admin.directory.user,https://www.googleapis.com/auth/drive)
5. Open the JSON file you have saved before. Copy the **Client ID** value from the file. Paste the value in the **Client ID** field in the prompt.
6. In the **OAuth scopes (comma-delimited)** field, paste the string in the field from the prompt:\
[https://www.googleapis.com/auth/admin.directory.group,https://www.googleapis.com/auth/admin.directory.user,https://www.googleapis.com/auth/drive](https://www.googleapis.com/auth/admin.directory.group,https://www.googleapis.com/auth/admin.directory.user,https://www.googleapis.com/auth/drive)
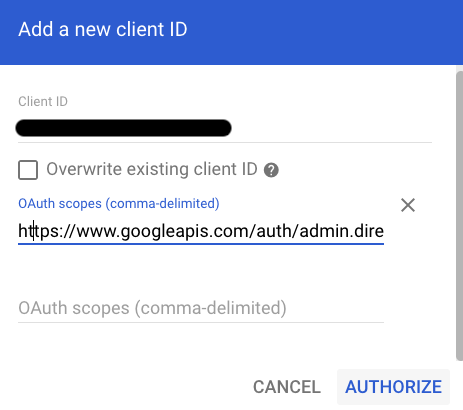 Click **Authorize** to continue.
## Google Cloud Platform quotas
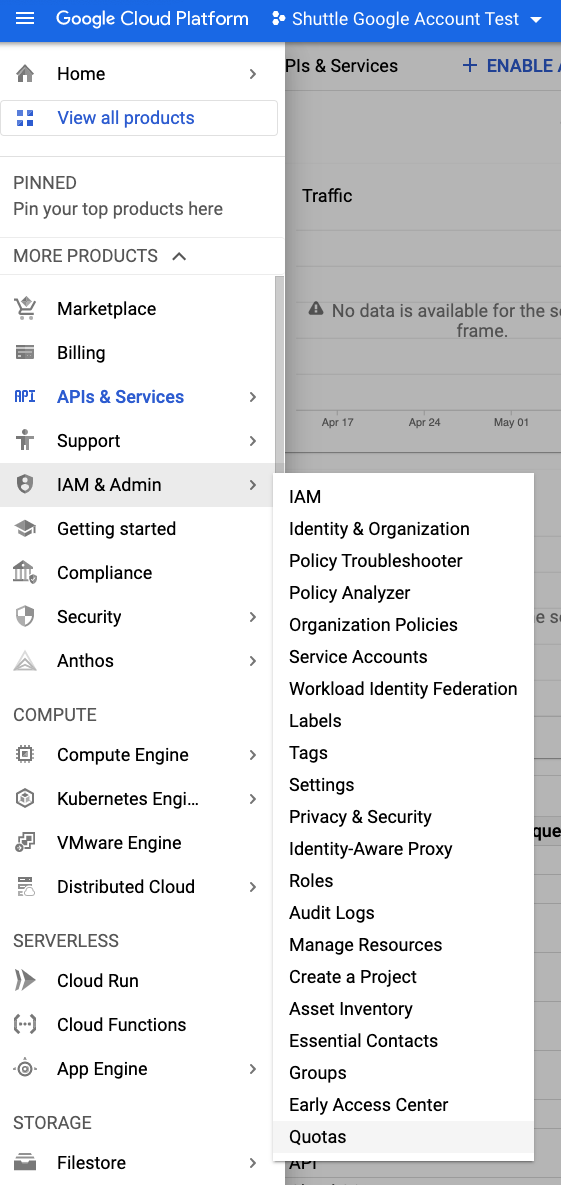
1. Go to your [Google Cloud Platform dashboard page](https://console.developers.google.com/). Use the menu to go to **IAM & Admin** > **Quotas**.
Click **Authorize** to continue.
## Google Cloud Platform quotas
1. Go to your [Google Cloud Platform dashboard page](https://console.developers.google.com/). Use the menu to go to **IAM & Admin** > **Quotas**.
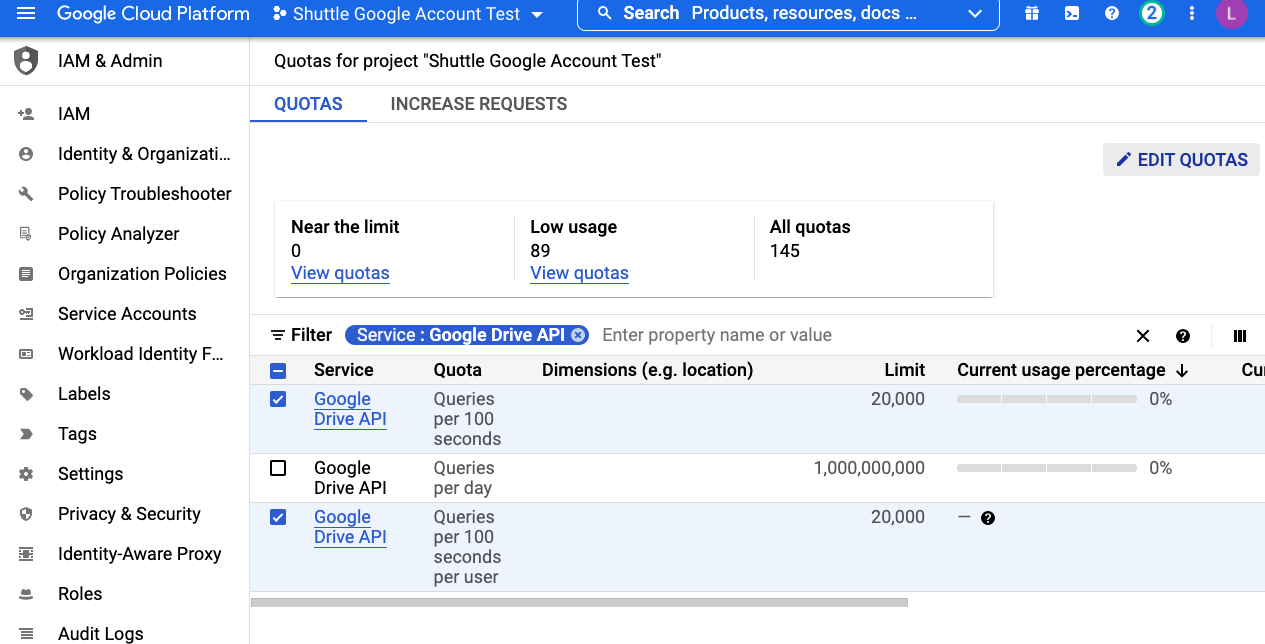
 2. At the Quotas page, use the search bar next to Filter in the table. Search for **Google Drive API**. Select the **Google Drive API** by clicking the box.
 3. Click **Edit Quotas**.
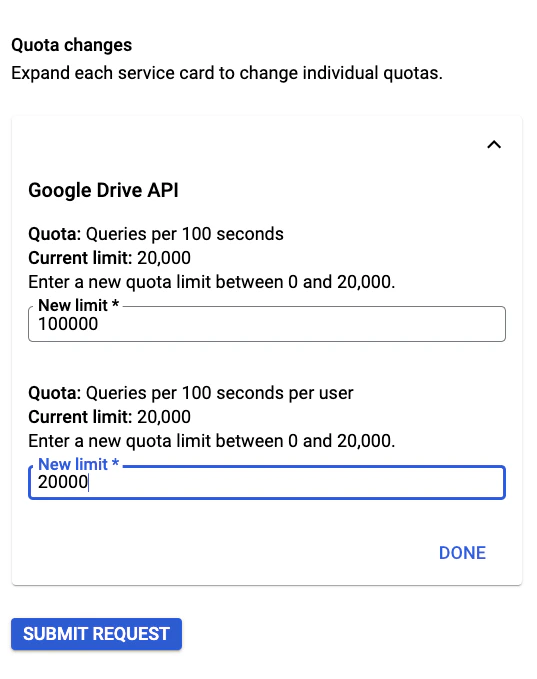
 4. At the prompt, update the values for the Google Drive API with the following info.To edit the values, your project must be linked to a billing account. Click **Submit Request**.
* Queries per 100 seconds: **100000**
* Queries per 100 seconds per user: **20000**
4. At the prompt, update the values for the Google Drive API with the following info.To edit the values, your project must be linked to a billing account. Click **Submit Request**.
* Queries per 100 seconds: **100000**
* Queries per 100 seconds per user: **20000**
 # Source analysis
Running an Analysis job helps you understand your source data at a more comprehensive level. The analysis report includes information on data type, size, age, and permissions.
As a result, it is easier to divide a large and complex job into smaller manageable pieces to plan which departments or sections to migrate first, as well as to come up with a reasonable approach to migrate your users and their data. This way, large projects can finish quicker, cost-effectively, with fewer conflicts, and more efficient delta runs.
The following instructions guide you through the process of setting up your source system and analyzing the files and folders in the origin location.
## Configuring a Google Drive source
1. On Box Shuttle home page, click **+** to create a new job.
# Source analysis
Running an Analysis job helps you understand your source data at a more comprehensive level. The analysis report includes information on data type, size, age, and permissions.
As a result, it is easier to divide a large and complex job into smaller manageable pieces to plan which departments or sections to migrate first, as well as to come up with a reasonable approach to migrate your users and their data. This way, large projects can finish quicker, cost-effectively, with fewer conflicts, and more efficient delta runs.
The following instructions guide you through the process of setting up your source system and analyzing the files and folders in the origin location.
## Configuring a Google Drive source
1. On Box Shuttle home page, click **+** to create a new job.
 2. Click **Analyze Data**.
 3. Under **Configure a new system**, click the **G-Drive** tile.
4. Click **Log in to Google Drive**.
5. Add the administrator email.
3. Under **Configure a new system**, click the **G-Drive** tile.
4. Click **Log in to Google Drive**.
5. Add the administrator email.
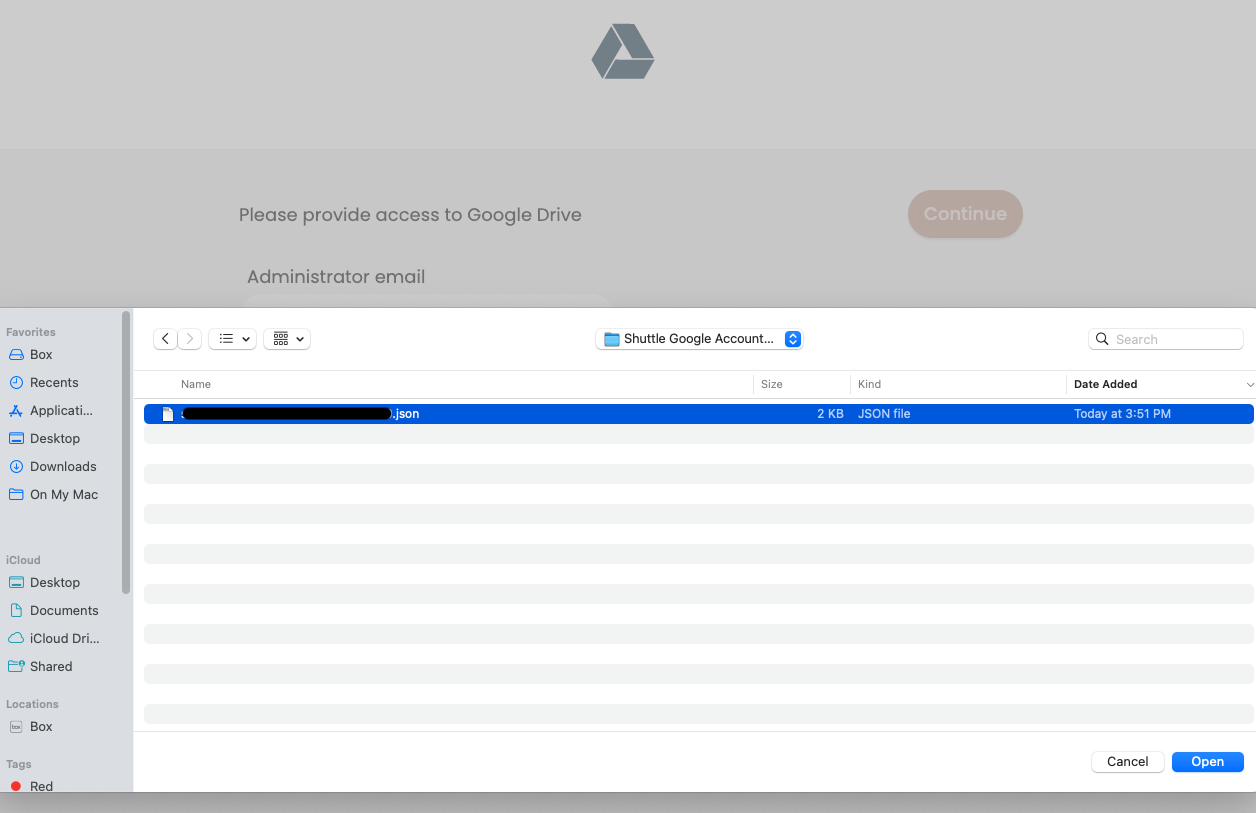
 6. Provide access to G-Drive with credentials from your JSON file. Click **Choose file** to open the file explorer.
7. Select the JSON file you have saved during Google Cloud Platform configuration and click **Open**.
6. Provide access to G-Drive with credentials from your JSON file. Click **Choose file** to open the file explorer.
7. Select the JSON file you have saved during Google Cloud Platform configuration and click **Open**.
 ## Running an analysis
Once you have your Google Drive source configured, you can begin to run jobs.
1. Click the **+** icon a to create a new job.
2. Click **Analyze Data**.
3. Under **Systems that you configured before** select the **Google Drive** source.
4. Authenticate and click **Continue**.
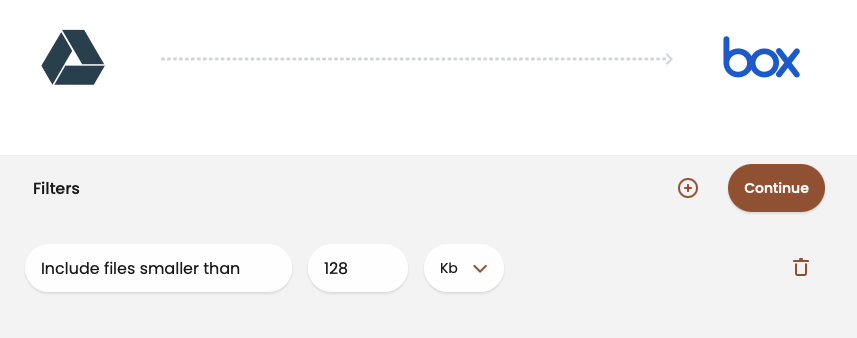
5. Under **Filters**, create a filter to include or exclude files. Use **+** to add a filter or the trash bin icon to remove an existing one. Click **Continue** to proceed.
## Running an analysis
Once you have your Google Drive source configured, you can begin to run jobs.
1. Click the **+** icon a to create a new job.
2. Click **Analyze Data**.
3. Under **Systems that you configured before** select the **Google Drive** source.
4. Authenticate and click **Continue**.
5. Under **Filters**, create a filter to include or exclude files. Use **+** to add a filter or the trash bin icon to remove an existing one. Click **Continue** to proceed.
 6. On the Select file locations page, choose the source files to analyze.
* Hover over the row to reveal a folder explorer icon
6. On the Select file locations page, choose the source files to analyze.
* Hover over the row to reveal a folder explorer icon 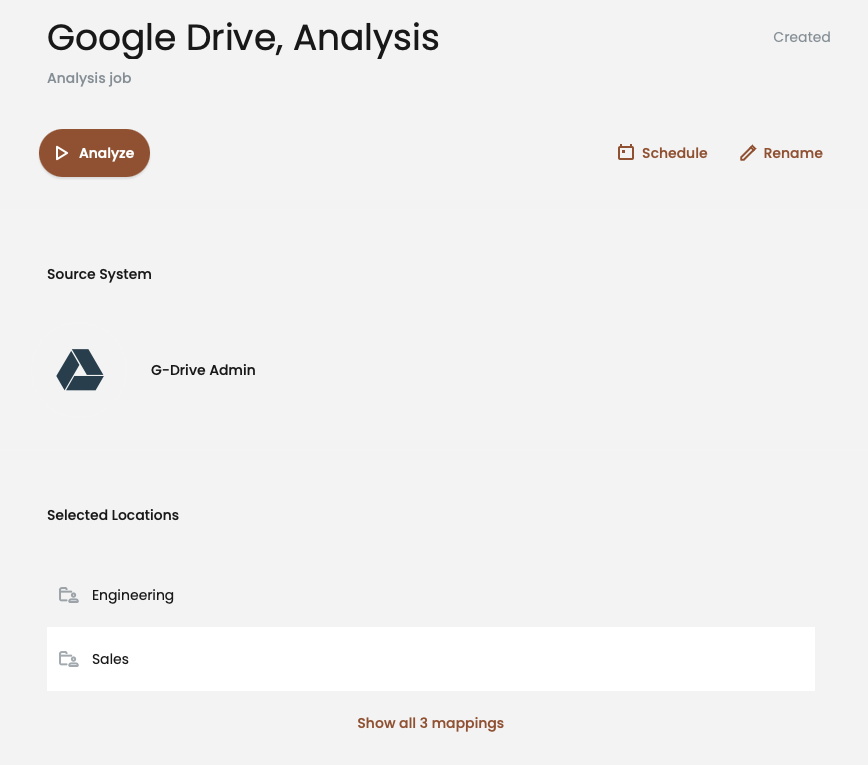 * **Schedule** sets a specific date and time in the future for the **Migrate Data** job to run. This option also allows for adding the job to the queue.
* **Rename** lets you change the name of the job.
* Click **Analyze** to start the job. It may take some time to complete.
* The upper-right corner shows current actions and updates.
* **View Results** displays details of the job.
* **Stop** ends the job before it is complete.
* When the analysis is complete, the page displays statistics in a table. Clicking **Done** redirects you to the home page.
## Reviewing analysis results
The analysis results provide details of your source system. You can filter, sort, and export your data.
1. To check the results go to the home page and click the job you want to examine.
2. Click **View Results** to see the details of your analysis.
* * The top overview section provides details about the job and analyzed files.
* **Analysis Statistics** displays a chart with results.
* Use
* **Schedule** sets a specific date and time in the future for the **Migrate Data** job to run. This option also allows for adding the job to the queue.
* **Rename** lets you change the name of the job.
* Click **Analyze** to start the job. It may take some time to complete.
* The upper-right corner shows current actions and updates.
* **View Results** displays details of the job.
* **Stop** ends the job before it is complete.
* When the analysis is complete, the page displays statistics in a table. Clicking **Done** redirects you to the home page.
## Reviewing analysis results
The analysis results provide details of your source system. You can filter, sort, and export your data.
1. To check the results go to the home page and click the job you want to examine.
2. Click **View Results** to see the details of your analysis.
* * The top overview section provides details about the job and analyzed files.
* **Analysis Statistics** displays a chart with results.
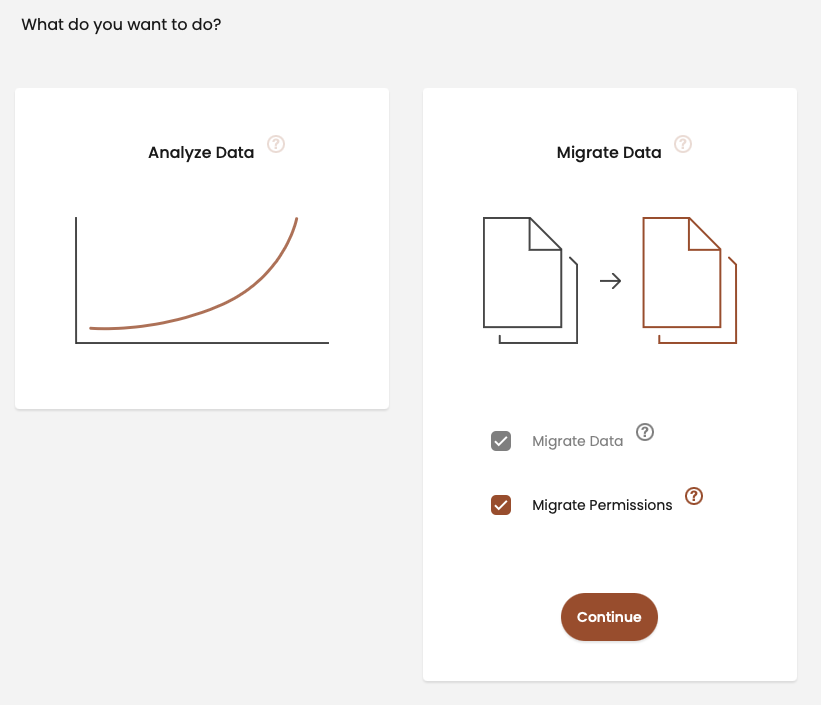
* Use 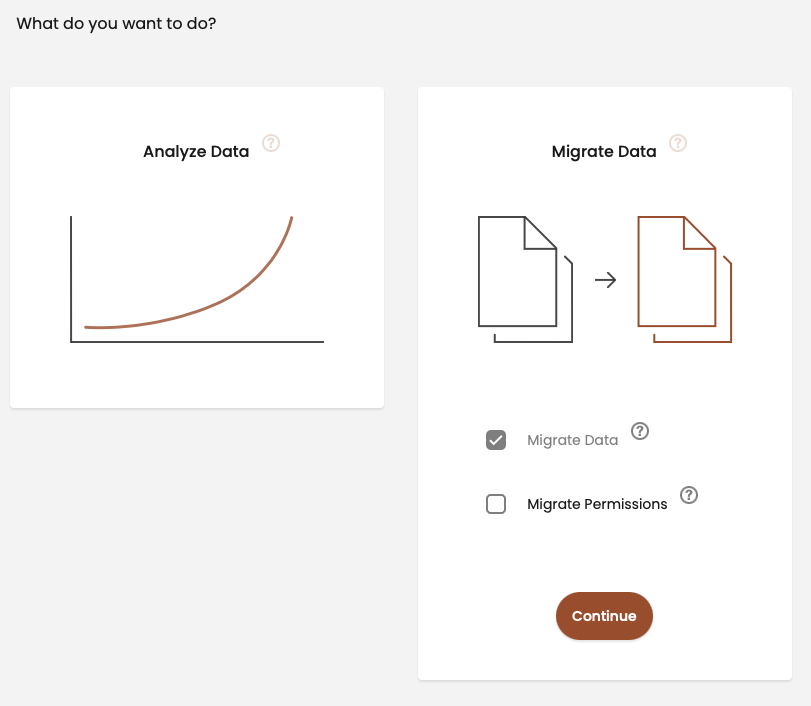 * **Migrate Data** is checked by default. This job moves data from one location to another.
* **Migrate Permissions** allows you to migrate data along with permission settings.
3. Select **Migrate Data**.
4. Under **Choose source system**, click the configured **Google Drive** system. Confirm the account information, authenticate, and click **Continue**.
5. Under **Choose target system**, select the Box account as the destination.
* If a Box system isn’t already configured, select Box under **Configure a new system**.
* **Migrate Data** is checked by default. This job moves data from one location to another.
* **Migrate Permissions** allows you to migrate data along with permission settings.
3. Select **Migrate Data**.
4. Under **Choose source system**, click the configured **Google Drive** system. Confirm the account information, authenticate, and click **Continue**.
5. Under **Choose target system**, select the Box account as the destination.
* If a Box system isn’t already configured, select Box under **Configure a new system**.
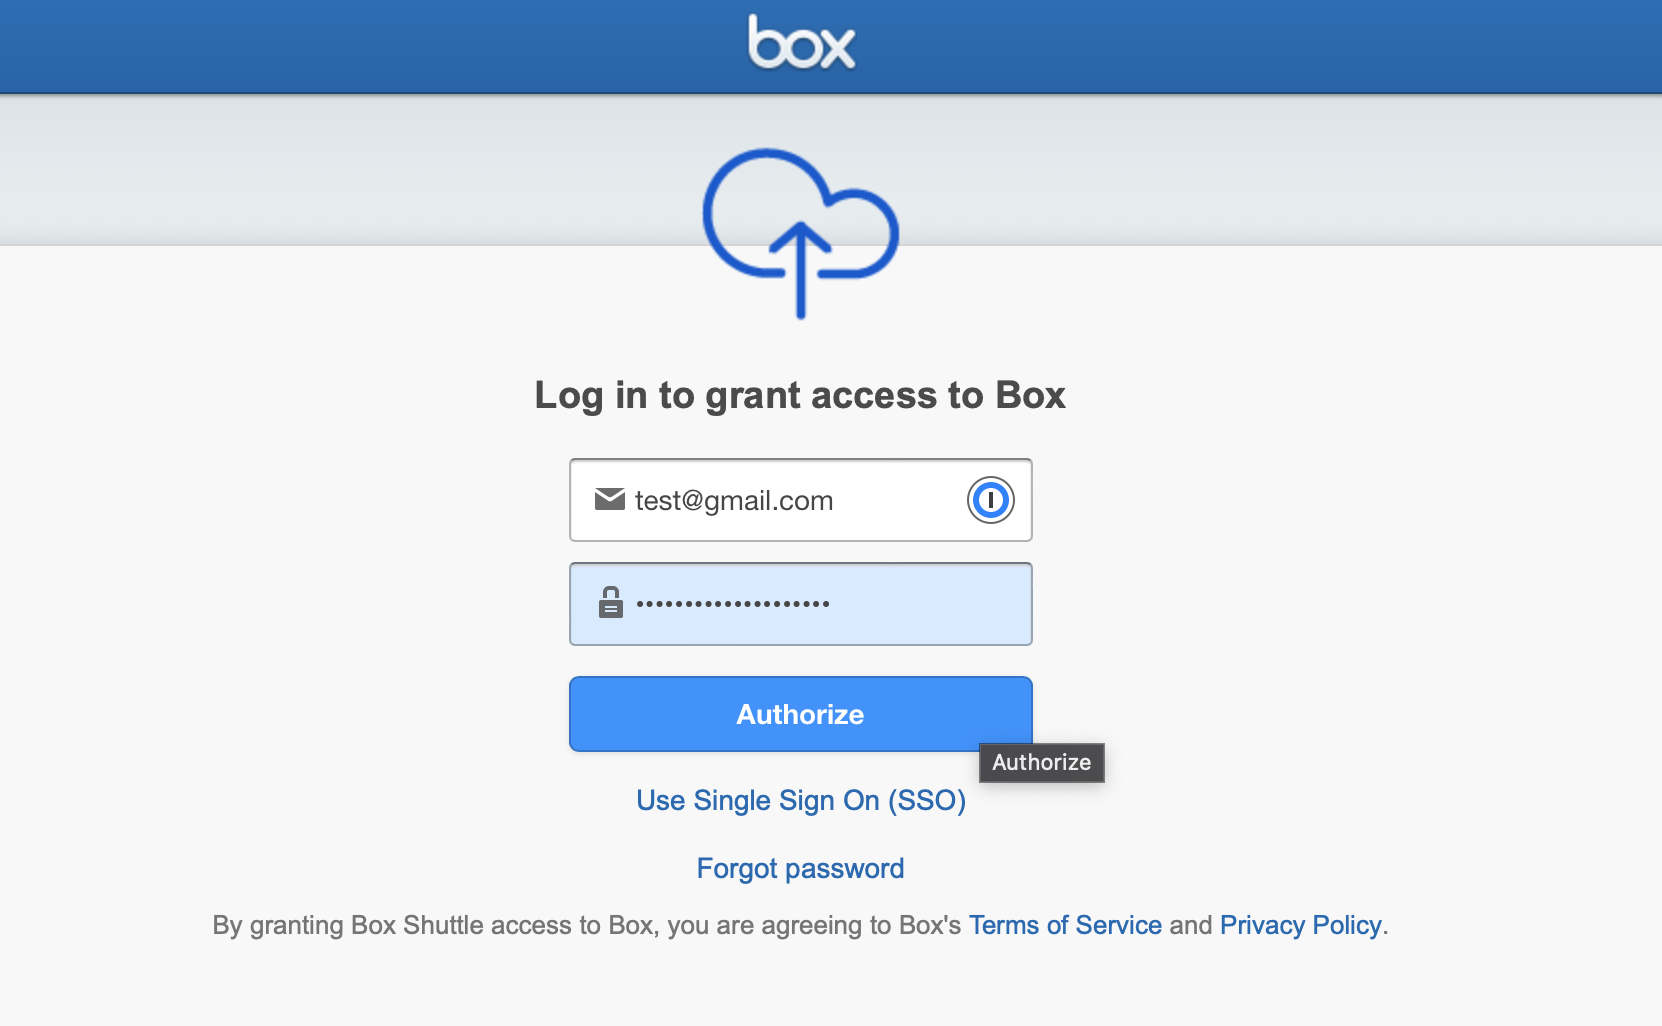 * Enter your Box account credentials and click **Authorize.**
* Review the permissions for Box Shuttle and click **Grant access to Box**.
* If you’ve already configured an account, confirm the account information and authentication and click **Continue**.
6. The next section prompts you to configure migrating file versions. Select **Migrate current version only** or **Migrate all versions** to continue.
* Enter your Box account credentials and click **Authorize.**
* Review the permissions for Box Shuttle and click **Grant access to Box**.
* If you’ve already configured an account, confirm the account information and authentication and click **Continue**.
6. The next section prompts you to configure migrating file versions. Select **Migrate current version only** or **Migrate all versions** to continue.
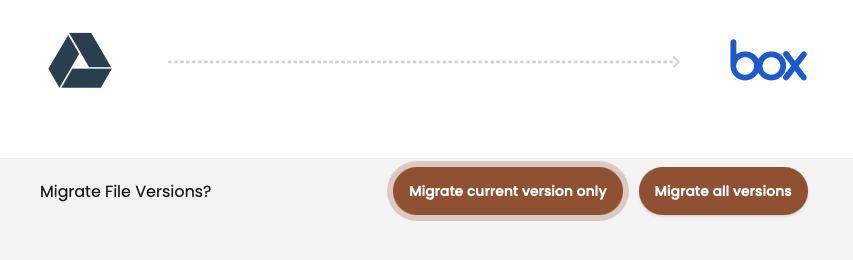 **Note:** If you want to migrate all versions, you must migrate them in order, starting with version 1. If you choose the current version, you cannot migrate previous ones later.
7\. Under **Filters**, create a filter to include or exclude files. Use **+** to add a filter or the trash bin icon to remove an existing one. Click **Continue** to proceed.
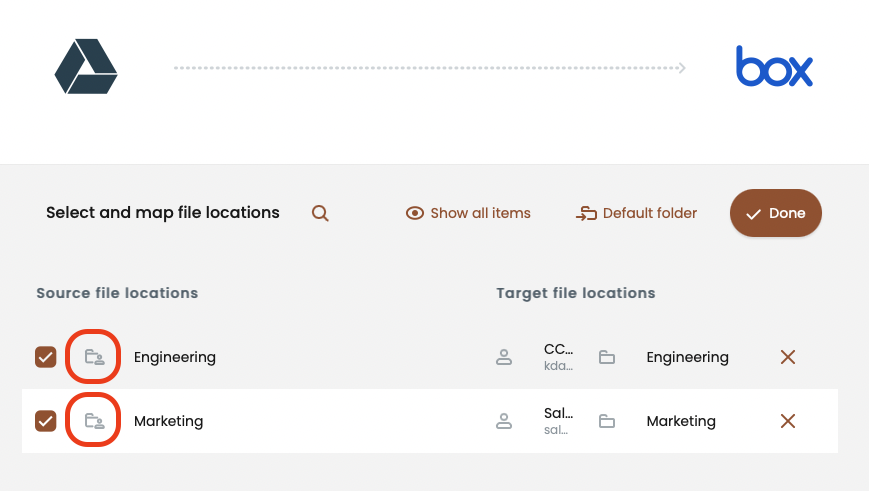
8\. Under Select and map file locations, choose the source file locations and accounts to migrate. When you select a source file location, the choose target location box appears. Use the folder explorer
**Note:** If you want to migrate all versions, you must migrate them in order, starting with version 1. If you choose the current version, you cannot migrate previous ones later.
7\. Under **Filters**, create a filter to include or exclude files. Use **+** to add a filter or the trash bin icon to remove an existing one. Click **Continue** to proceed.
8\. Under Select and map file locations, choose the source file locations and accounts to migrate. When you select a source file location, the choose target location box appears. Use the folder explorer 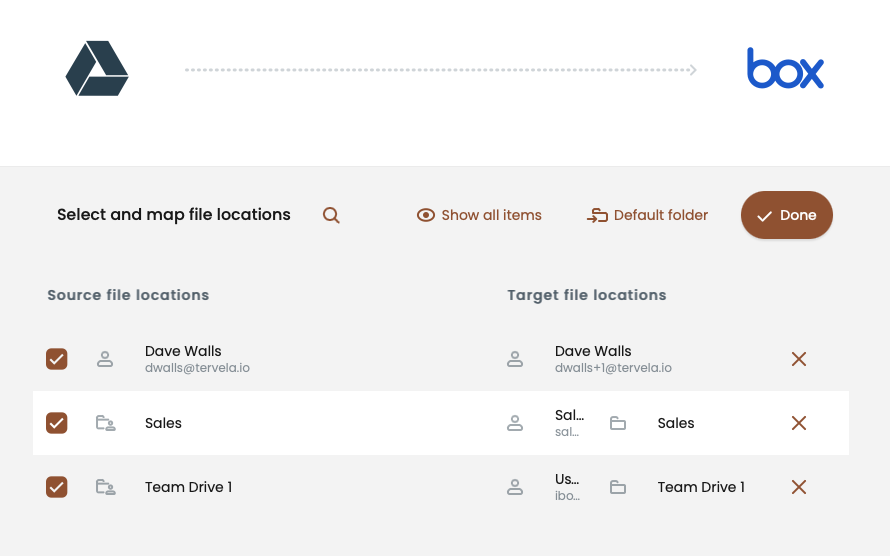 * The
* The  9. Click **Done** to continue.
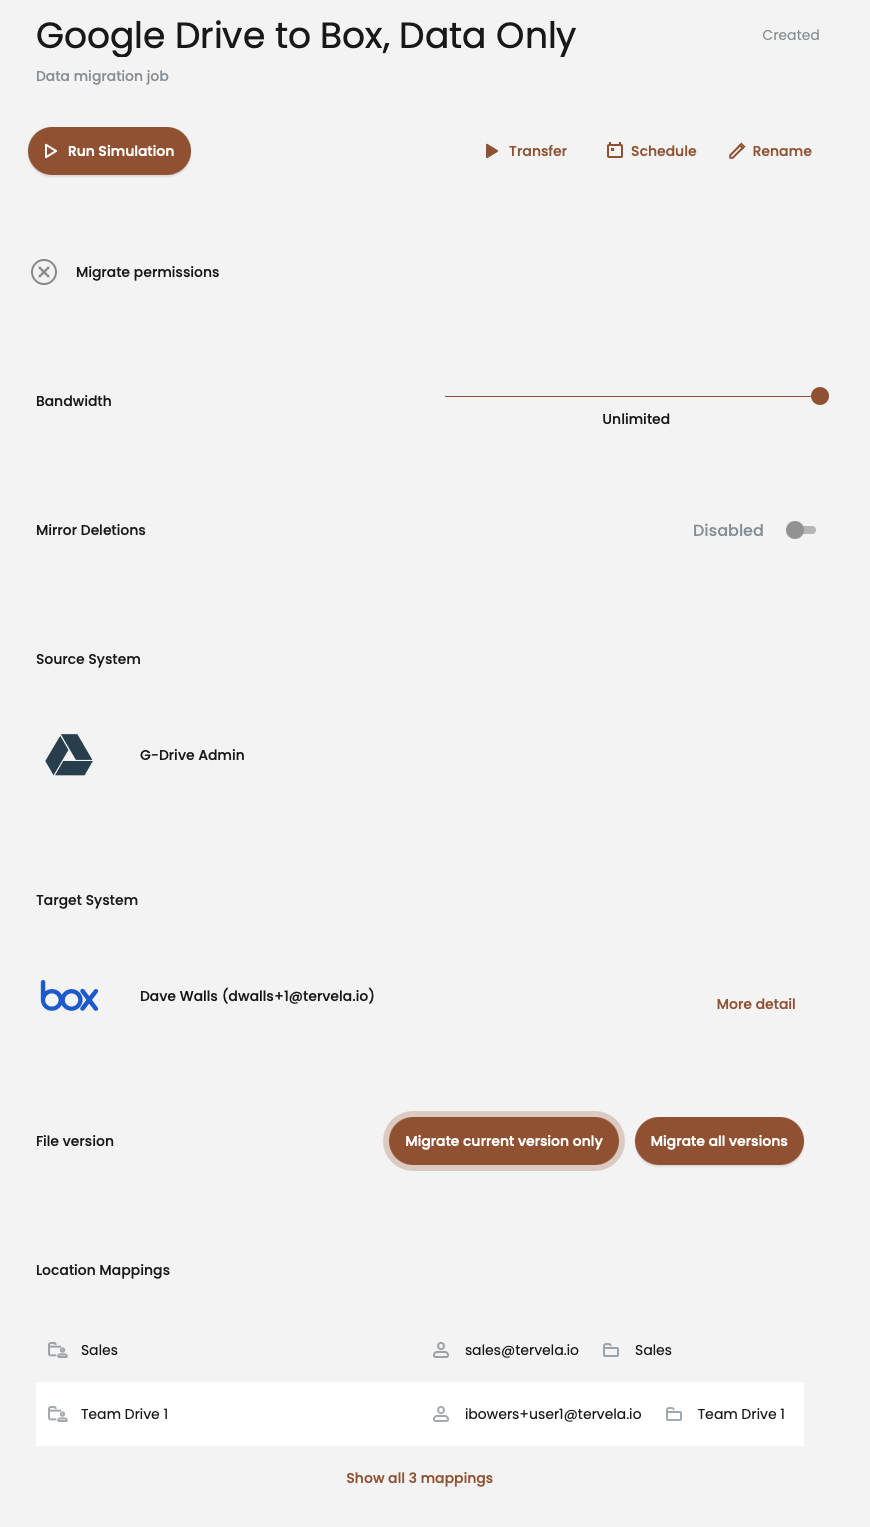
10. The configuration summary contains the following sections:
* actions you can perform
* ownership and permission
* mirror deletions that, if selected, deletes the files that are on the target but not on the source.\
**Note**: Do not enable the mirror deletions option without understanding how it deletes data in the target location.
* source system
* items to migrate
* target system details
9. Click **Done** to continue.
10. The configuration summary contains the following sections:
* actions you can perform
* ownership and permission
* mirror deletions that, if selected, deletes the files that are on the target but not on the source.\
**Note**: Do not enable the mirror deletions option without understanding how it deletes data in the target location.
* source system
* items to migrate
* target system details
 11. You can now run a **Simulation** that serves as a quality check for your data migration projects. For details, see [Simulation and transfer.](#simulation-and-transfer)
## Migrating permissions in data-only jobs
If you run a data-only job, you must manually add permissions to the data once it lands in Box. This action restores previously available access in Google Drive. Consider migrating permissions and data together. See [Data migration including permissions](#data-migration-including-permissions) for instructions.
11. You can now run a **Simulation** that serves as a quality check for your data migration projects. For details, see [Simulation and transfer.](#simulation-and-transfer)
## Migrating permissions in data-only jobs
If you run a data-only job, you must manually add permissions to the data once it lands in Box. This action restores previously available access in Google Drive. Consider migrating permissions and data together. See [Data migration including permissions](#data-migration-including-permissions) for instructions.
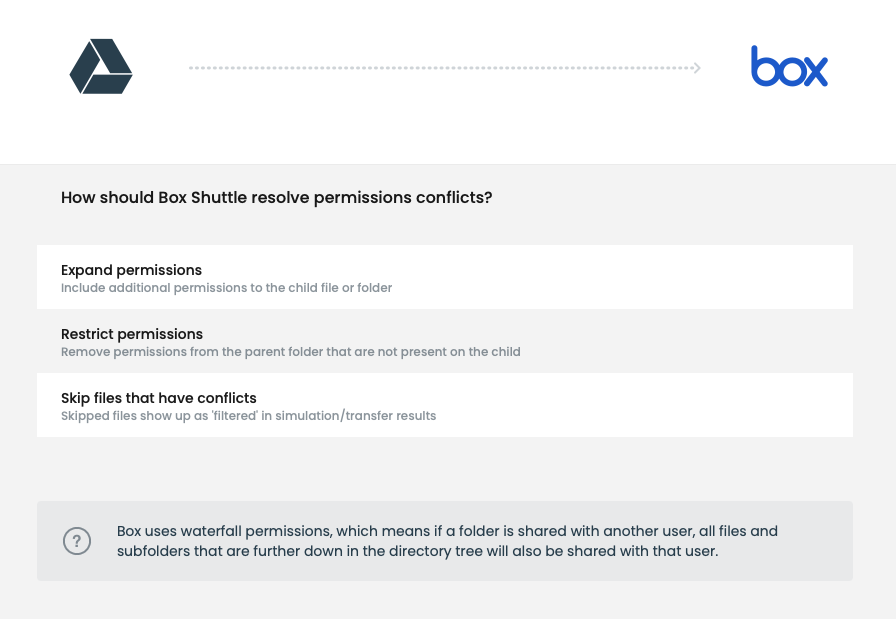
| Expand permissions | Adds permissions to child folders or files if they have fewer permissions than a parent. | |
|---|---|---|
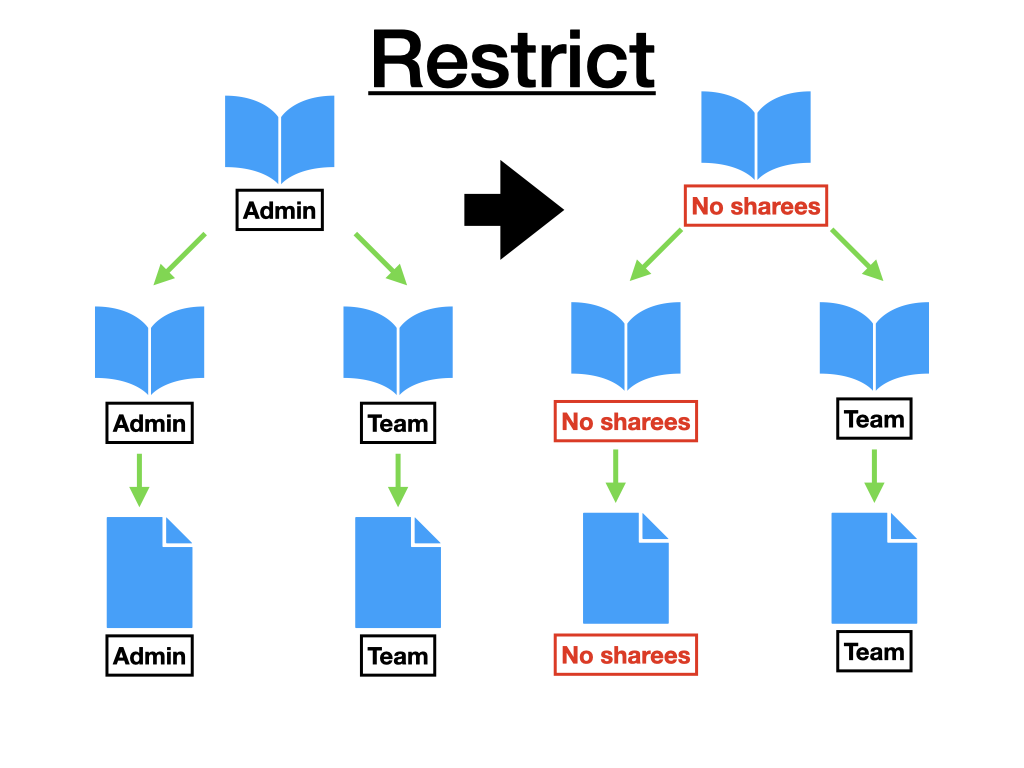
| Restrict permissions | Removes permissions from the parent folder if a child has fewer permissions than the parent. | |
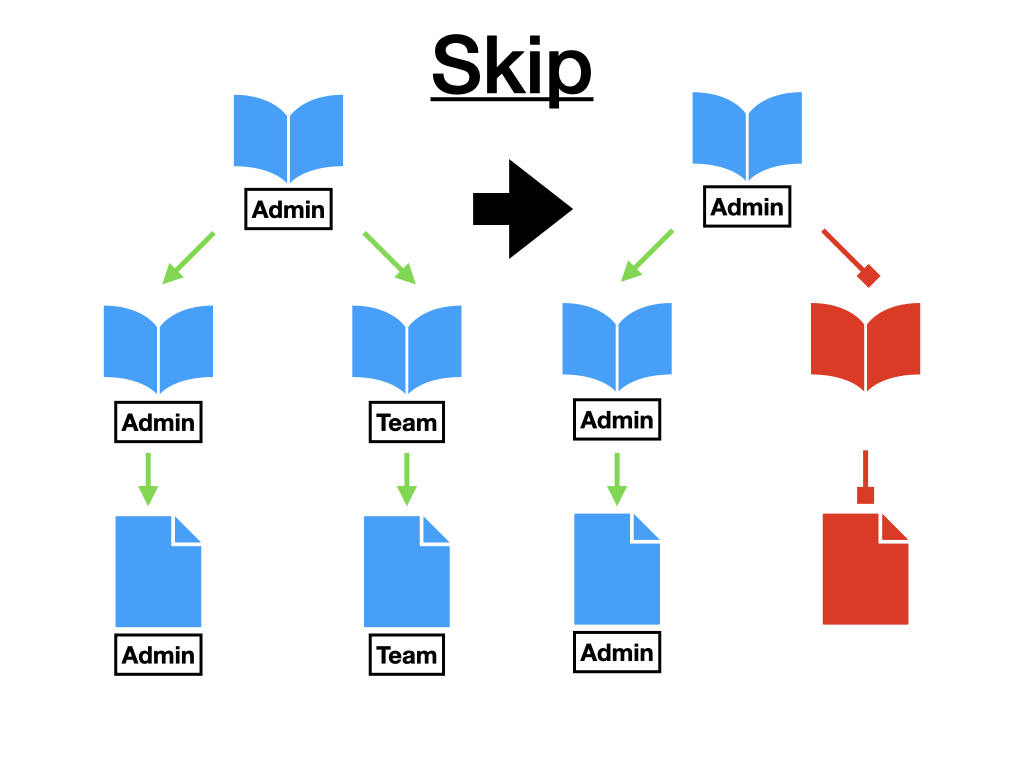
| Skip files that have conflicts | These folders or files are not transferred in the data migration because they have reduced permissions relative to a parent. They display as filtered in results. | |
 3. Under **Choose source system**, click the already configured **Google Drive** system. Confirm the account information, authenticate, and click **Continue**.
4. Under **Choose target system**, select the Box account as the destination. Confirm the account information, authenticate, and click **Continue**.
5. Select your file version migration: **Migrate current version only** or **Migrate all versions.**
If you want to migrate previous versions, you must include them all. Migrations with the current version configuration do not include previous versions, and they cannot be migrated later on.
6\. Under **Filters**, create a filter to include or exclude files. Use **+** to add a filter or the trash bin icon to remove an existing one. Click **Continue** to proceed.
7. At this point, you can choose how to resolve permission conflicts during the data transfer process. Select the option appropriate for your data migration job. See [Permission Conflicts](#permission-conflicts) for details.
3. Under **Choose source system**, click the already configured **Google Drive** system. Confirm the account information, authenticate, and click **Continue**.
4. Under **Choose target system**, select the Box account as the destination. Confirm the account information, authenticate, and click **Continue**.
5. Select your file version migration: **Migrate current version only** or **Migrate all versions.**
If you want to migrate previous versions, you must include them all. Migrations with the current version configuration do not include previous versions, and they cannot be migrated later on.
6\. Under **Filters**, create a filter to include or exclude files. Use **+** to add a filter or the trash bin icon to remove an existing one. Click **Continue** to proceed.
7. At this point, you can choose how to resolve permission conflicts during the data transfer process. Select the option appropriate for your data migration job. See [Permission Conflicts](#permission-conflicts) for details.
 8. Under **Select and map file locations**, choose the source file locations and accounts to migrate. When selecting items, the **choose target location** button displays the available accounts in the target system for the respective selection.
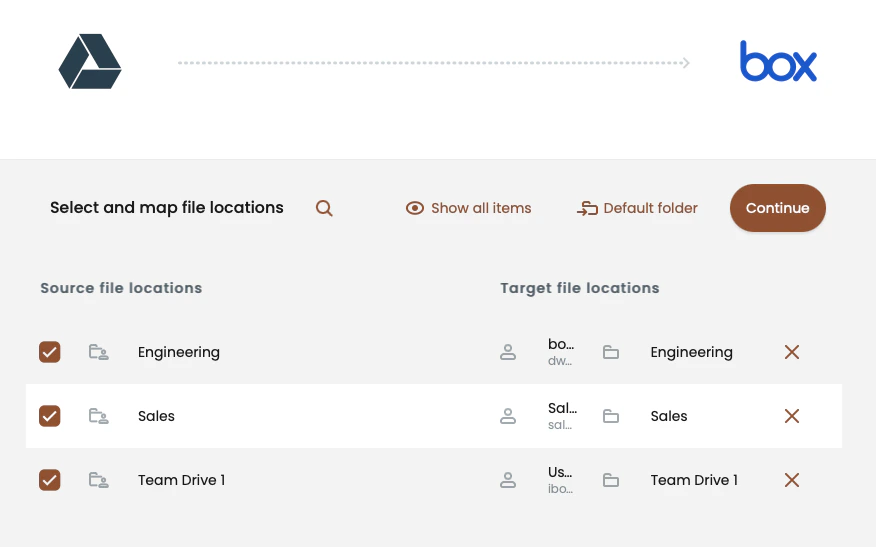 To migrate a Shared Drive, select a specific Shared Drive folder from the enumerated list of personal accounts and Shared Drives. The admin user applied to the Google Drive connector must have manager access for Shared Drive folders that will be migrated.
 Sites, document libraries, and directories selected are all written to Box as directories.
* Use the **Default folder** button to specify the default parent folder.
* The **+ Create a new folder** button allows you to add a new folder.
* The **Root folder** button sends your data to the root **(/)** of the designated Box target directory.
9. The Migrate Permissions job examines the source to ensure source items map correctly from the source to the target.
Sites, document libraries, and directories selected are all written to Box as directories.
* Use the **Default folder** button to specify the default parent folder.
* The **+ Create a new folder** button allows you to add a new folder.
* The **Root folder** button sends your data to the root **(/)** of the designated Box target directory.
9. The Migrate Permissions job examines the source to ensure source items map correctly from the source to the target.
 * Click **Examine** to continue with the job.
* Click **Cancel** to return to the **Select and map file locations** page.
10. When the examination job finished, click **Done** to continue.
* If Box Shuttle finds errors examining the source, see the conflicts by clicking **View Errors**. You can also **download the full list of paths** to get a **.CSV** file for your reference. Review the list of errors for guidance on how to resolve them.
* Click **Re-examine paths** to run the examination once again if you have made any changes. Click **Skip paths and continue** to omit the file paths and leave.
11. When the examination is complete, you return to the **Select and Map Users and Groups** page. View the list of source users and groups to map to target users and groups. Box Shuttle automatically matches identical users and groups. Click **Continue** to proceed.\
**Note**: All displayed accounts must be mapped or deselected (marked as **skipped**) before you can continue.
* Click **Examine** to continue with the job.
* Click **Cancel** to return to the **Select and map file locations** page.
10. When the examination job finished, click **Done** to continue.
* If Box Shuttle finds errors examining the source, see the conflicts by clicking **View Errors**. You can also **download the full list of paths** to get a **.CSV** file for your reference. Review the list of errors for guidance on how to resolve them.
* Click **Re-examine paths** to run the examination once again if you have made any changes. Click **Skip paths and continue** to omit the file paths and leave.
11. When the examination is complete, you return to the **Select and Map Users and Groups** page. View the list of source users and groups to map to target users and groups. Box Shuttle automatically matches identical users and groups. Click **Continue** to proceed.\
**Note**: All displayed accounts must be mapped or deselected (marked as **skipped**) before you can continue.
 * The mapped source users are the data owners whose accounts you selected for transfer. In addition, Box automatically matches identical collaborators from the source to the target.
* The unmapped source users and groups are collaborators for one or more items in the selected source accounts for transfer.
* To map the source user/group to a target account, clicking the respective **choose target user** on the right. The job displays a list of the valid users or groups to which you can map the source collaborator.
* To skip the transfer, deselect the checkbox next to a given user or group’s name to skip transfer.\
**Note:** Do not deselect source users whose accounts were already selected for transfer (data owners). Deselecting a data owner removes their data from transfer.
12. The next step is processing to scan target users and groups. Processing confirms the owner’s and collaborators’ permissions, paths on the target, and automatically matches according to best possible fit. Click **Process** to continue and **Done** when complete.
* The mapped source users are the data owners whose accounts you selected for transfer. In addition, Box automatically matches identical collaborators from the source to the target.
* The unmapped source users and groups are collaborators for one or more items in the selected source accounts for transfer.
* To map the source user/group to a target account, clicking the respective **choose target user** on the right. The job displays a list of the valid users or groups to which you can map the source collaborator.
* To skip the transfer, deselect the checkbox next to a given user or group’s name to skip transfer.\
**Note:** Do not deselect source users whose accounts were already selected for transfer (data owners). Deselecting a data owner removes their data from transfer.
12. The next step is processing to scan target users and groups. Processing confirms the owner’s and collaborators’ permissions, paths on the target, and automatically matches according to best possible fit. Click **Process** to continue and **Done** when complete.
 13. The last step is the job summary page. It includes information about:
* Mirror deletions checkbox that, if enabled, allows Shuttle to delete the files that are on the target but not on the source. Do not enable **Mirror Deletions** without understanding how it affects the target data. Always run and review simulation results when using Mirror Deletions.
* Source and target system
* Option to choose the file version to migrate
* Option you chose for solving migration issues
* Path and subject mappings
13. The last step is the job summary page. It includes information about:
* Mirror deletions checkbox that, if enabled, allows Shuttle to delete the files that are on the target but not on the source. Do not enable **Mirror Deletions** without understanding how it affects the target data. Always run and review simulation results when using Mirror Deletions.
* Source and target system
* Option to choose the file version to migrate
* Option you chose for solving migration issues
* Path and subject mappings
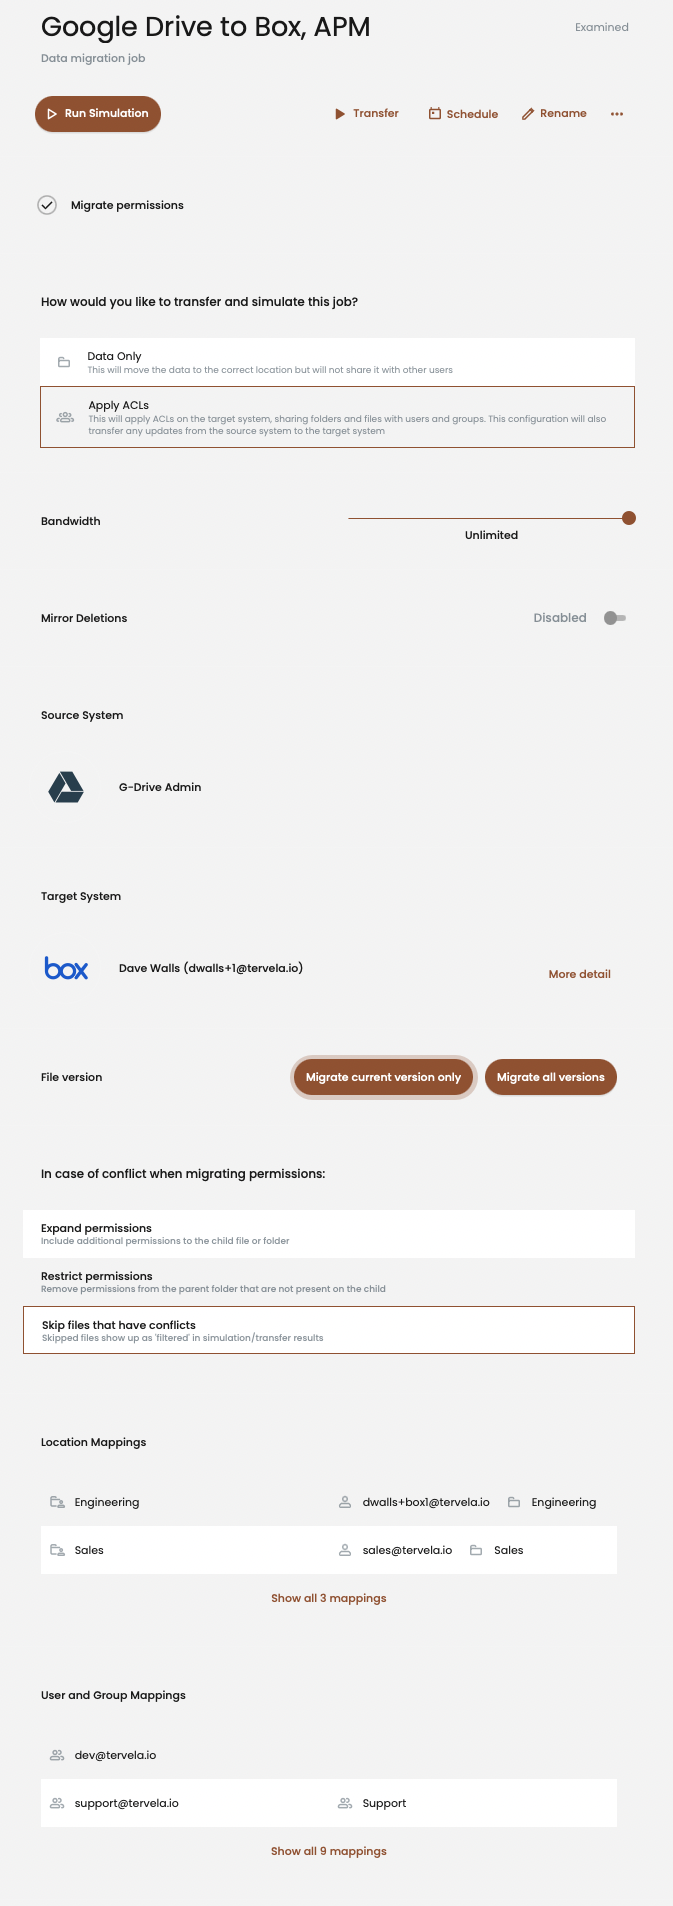 * **Run Simulation** performs an estimation on how this job will perform on a transfer run with its current configuration. When the simulation finishes, view the results for details on job performance. These reports include target path configurations as well as possible errors.
* **Transfer** immediately starts the data migration.\
**Note:** Running a Simulation before starting a transfer is highly recommended.
* **Schedule** sets a specific date and time in the future for the Migrate Data job to run. This option also allows for scheduling the job behind the queue of another job running.
14. **Run Simulation** continues with a preview test run. When the simulation is complete, click **View Results** to bring up the simulation summary page. For details, see [Running a simulation.](#running-a-simulation)
15. When ready to begin, click **Transfer** to start the data migration process. Once the job has completed, view the results on the Transfer summary page. For details, see [Running a data transfer.](#running-a-data-transfer)
* **Run Simulation** performs an estimation on how this job will perform on a transfer run with its current configuration. When the simulation finishes, view the results for details on job performance. These reports include target path configurations as well as possible errors.
* **Transfer** immediately starts the data migration.\
**Note:** Running a Simulation before starting a transfer is highly recommended.
* **Schedule** sets a specific date and time in the future for the Migrate Data job to run. This option also allows for scheduling the job behind the queue of another job running.
14. **Run Simulation** continues with a preview test run. When the simulation is complete, click **View Results** to bring up the simulation summary page. For details, see [Running a simulation.](#running-a-simulation)
15. When ready to begin, click **Transfer** to start the data migration process. Once the job has completed, view the results on the Transfer summary page. For details, see [Running a data transfer.](#running-a-data-transfer)
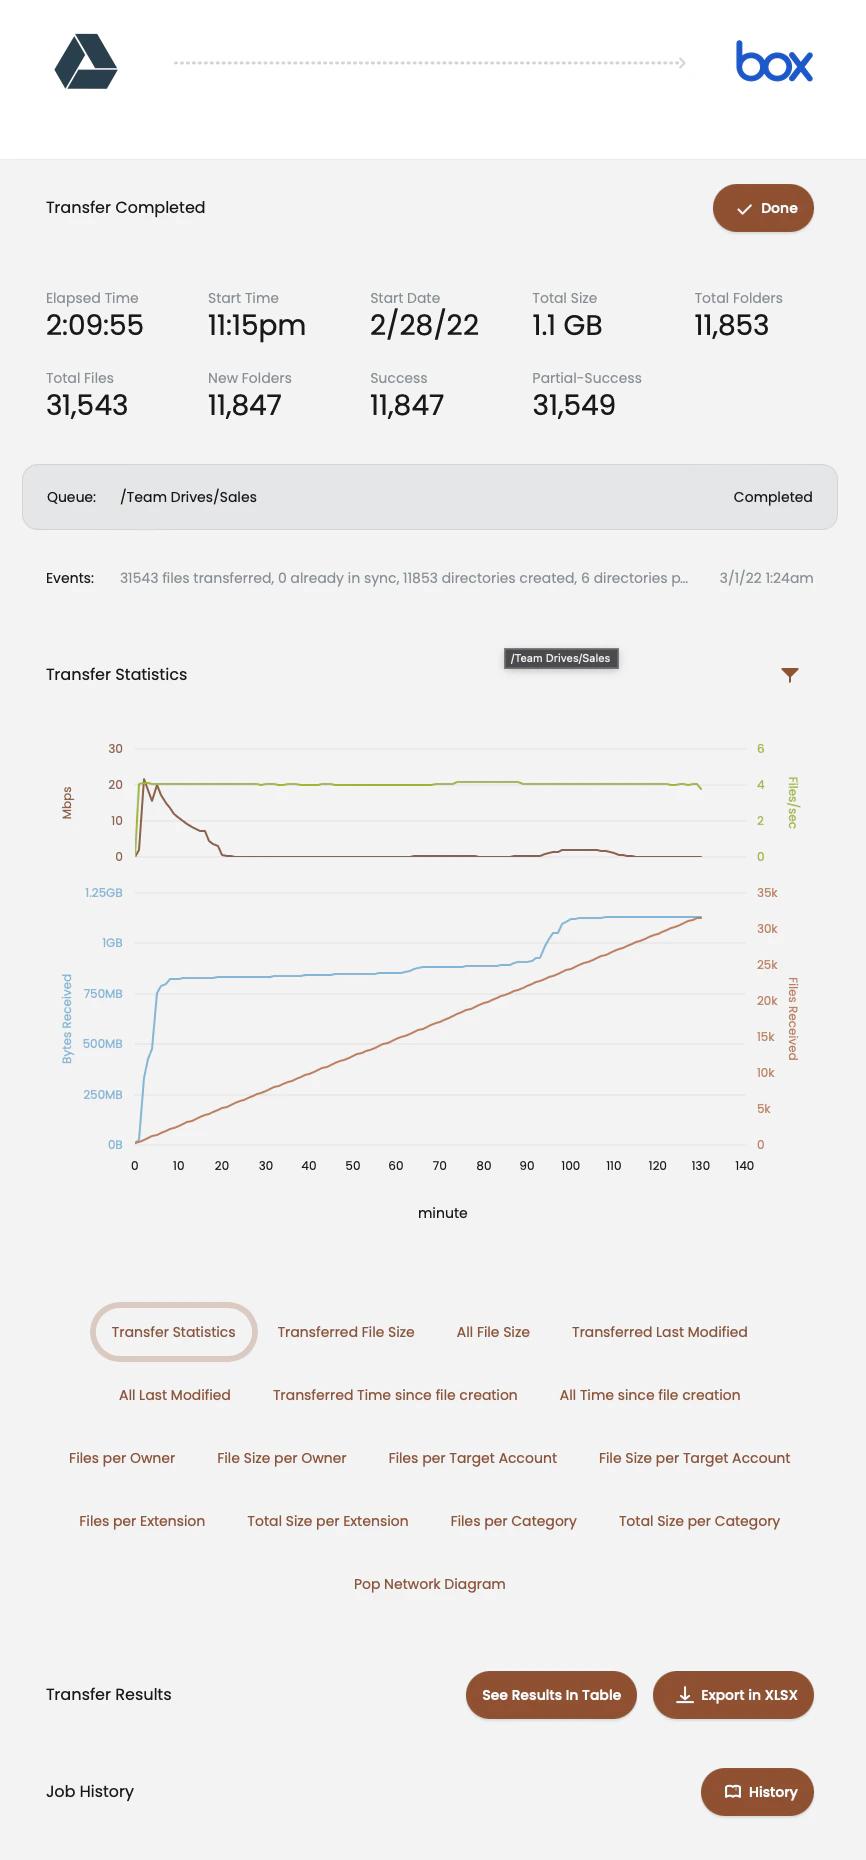 * * **Transfer Statistics** displays a chart with the results. Use the